How to Get Started on the AMD Developer Cloud
Jun 30, 2025

The newly launched AMD Developer Cloud offers developers easy access to high-performance AMD Instinct™ MI300X GPUs in a cloud environment. With seamless GitHub-based login, preconfigured ROCm™ software, and Docker setups, it’s an ideal platform for inference, fine-tuning, and training workloads.
Built for developers, researchers, and open-source enthusiasts alike, the AMD Developer Cloud provides flexibility based on each user's needs. Users can configure a VM from scratch with their preferred AI/ML software, choose a virtual machine (VM) with pre-installed Docker images for hassle-free access to major frameworks (i.e. PyTorch, vLLM, etc.), or launch directly into a ready-to-use JupyterLab environment available at VM creation.
In this blog, we’ll guide you through how to get started on the AMD Developer Cloud, explore different VM configuration options, explain how to access your VM after creation, and provide a hands-on example using the ready-to-use JupyterLab environment.
For a typical user, getting started is as simple as choosing a GPU plan and software image, adding an SSH key, creating the virtual machine with a single click, and accessing from their preferred SSH client.
Launching a Virtual Machine
1. Choose a GPU Plan:
After logging into your AMD Developer Cloud account, you’ll have multiple options for starting a virtual machine. First, choose whether you need a full AMD Instinct MI300X node that consists of 8 MI300X GPUs, or you can pick a single MI300X GPU. So, if you choose an 8x MI300X VM, your 25-hour quota will be consumed 8 times faster. Hence, 1 hour of usage on 8 GPUs counts as 8 GPU-hours.
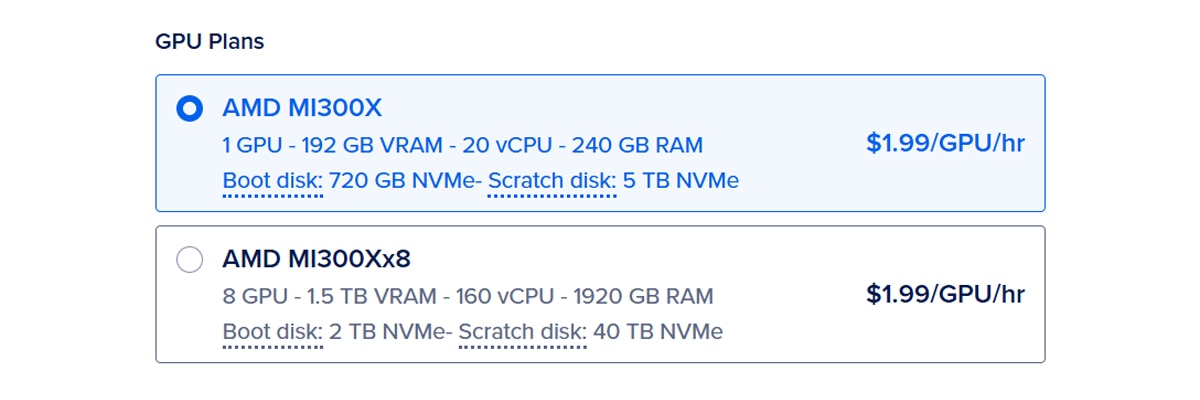
Figure 1: GPU Plans
2. Choose an Image
Next, it is time to select your desired image. These options are designed to give you flexibility based on what pre-installed packages you want to start with. You can select from the suite of images available under Bare OS or Quick Start tab.
2.1 Bare OS
You can choose to start with a minimal image, a bare OS installation. These come with only the operating system (various versions of Ubuntu are available), giving you full control to install any version of ROCm software yourself. This is ideal if you prefer building your environment from the ground up, selecting specific libraries or custom configurations.
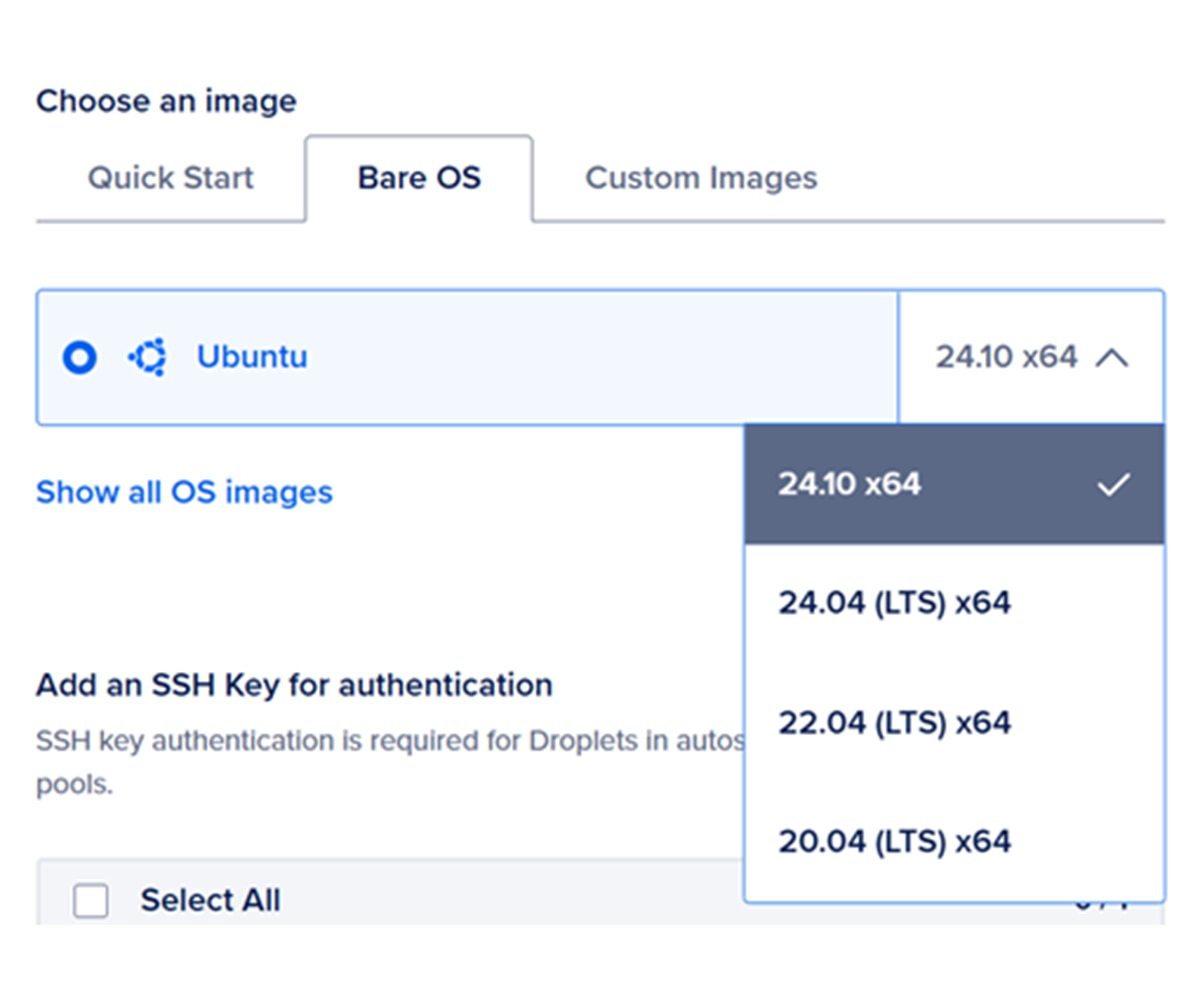
Figure 2: Bare OS image option
2.2 Quick Start (ROCm-Ready Images)
If you’d rather skip the setup and start coding, we provide a set of ROCm-ready images under the Quick Start section. These images come with the latest publicly available ROCm version pre-installed, giving you a ready-to-go environment. While Quick Start images have ROCm software pre-installed, you can always install your preferred version of ROCm on any VM by starting from bare OS.
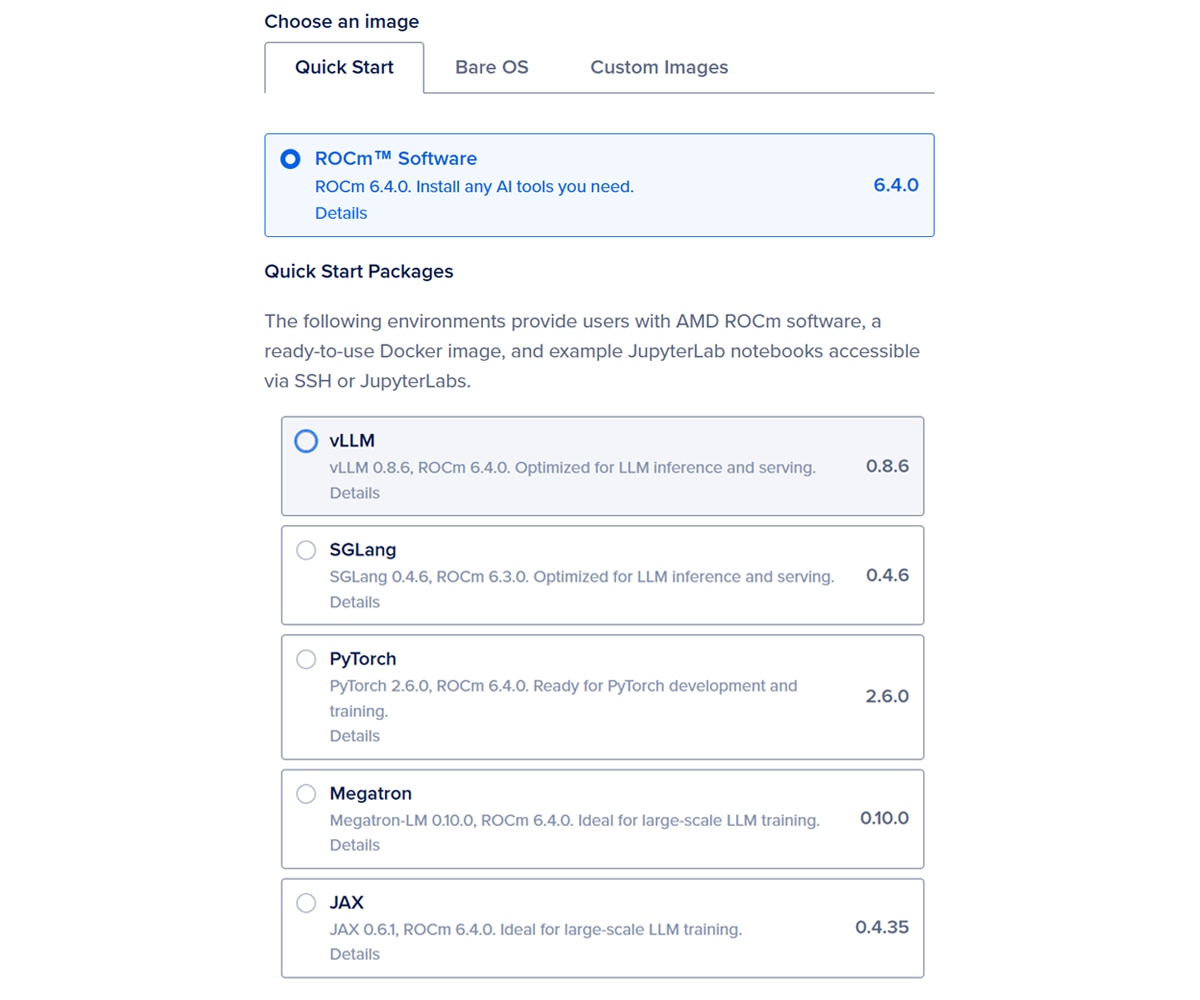
Figure 3: Quick Start Images
Within ROCm-ready images, you have two options:
- Vanilla ROCm: Includes ROCm with no additional AI/ML packages. Perfect for developers who want a clean slate to build on. Install PyTorch, pull a Docker image, or configure your stack however you like.
- Quick Start Packages: To make onboarding even easier, we also offer quick start images that include Docker images with pre-installed machine learning and LLM frameworks. These images come with packages like :
- vLLM
- SGLang
- PyTorch
- Megatron
- JAX
With these, you get all the benefits of the vanilla ROCm image plus a Docker container that’s already set up and ready. Once you connect to your VM with your preferred SSH client, you can access the docker container by just running:
docker exec -it rocm bash
This command puts you directly into a Docker container where the selected package is available to use immediately.
3. Add an SSH Key & Create a VM
To connect to your VM, you need to provide an SSH key. Click the “Add an SSH Key” button and follow the on-screen instructions to generate or upload your key. Paste the key into the designated field, give it a name, and you’re ready to create your VM. After you click "Create GPU Droplet," the site redirects you to your VM’s overview page.
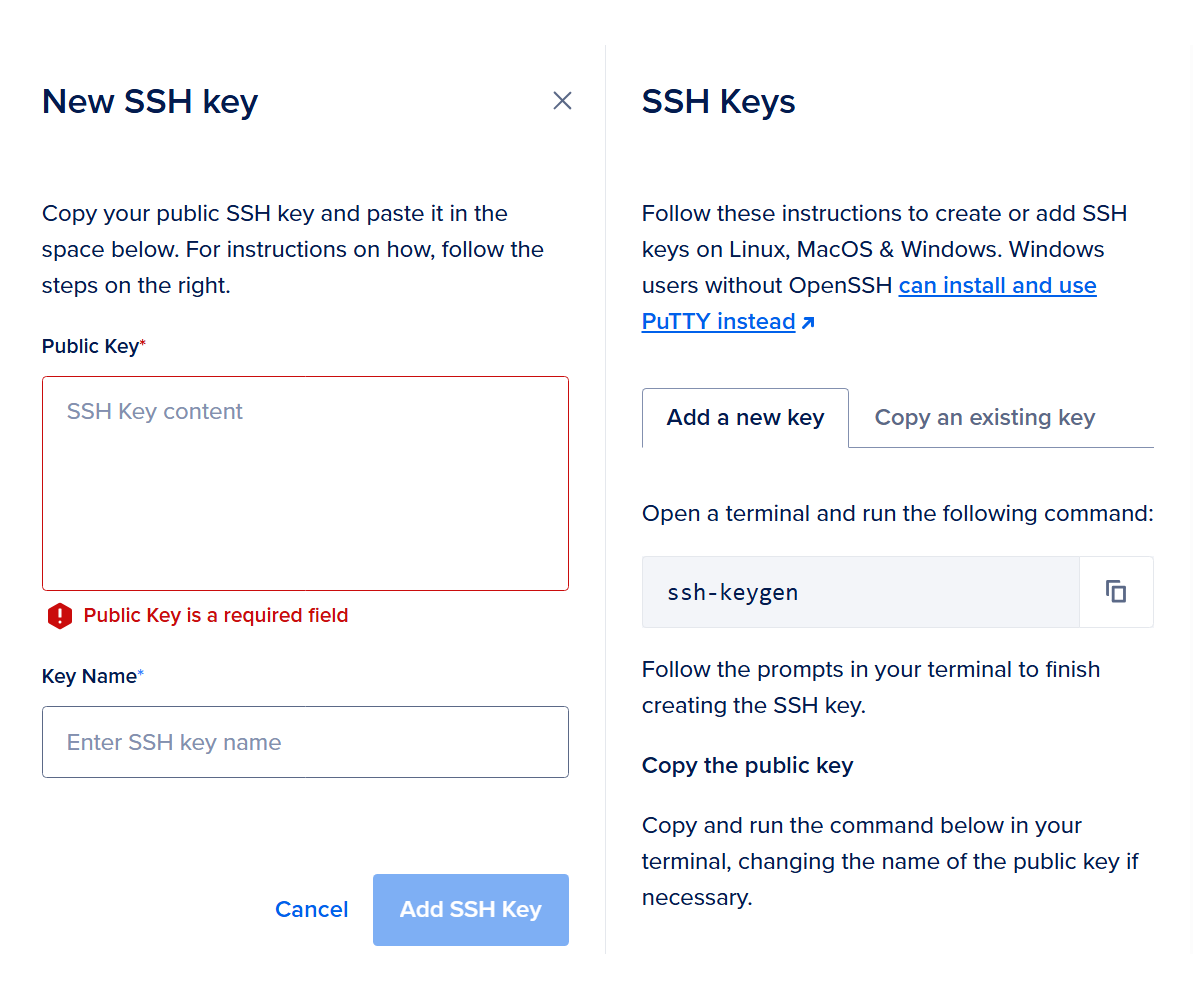
Figure 4: SSH Key
4. Accessing a VM
Once you complete the VM creation process, you'll see the overview page. Itdisplays your VM’s dedicated public IP address. For detailed instructions, click the “Quick Start” link under “Getting Started.” Below, we briefly explain how to connect to your VM using SSH, the web console, and the JupyterLab environment launched inside the Docker container.
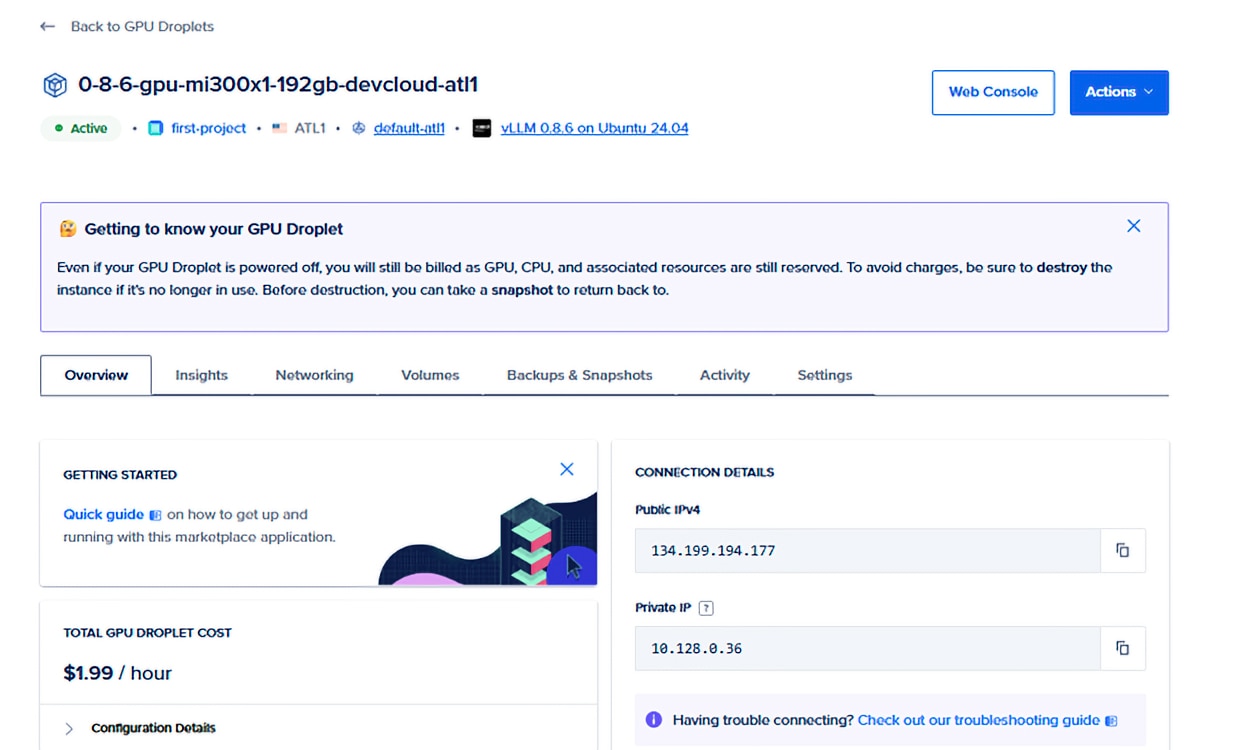
Figure 5: Successful VM Creation
4.1 SSH
For easy SSH access to your VM (assuming you added your SSH key during VM creation), open a terminal on your local machine and run the following command:
ssh root@<Public-IP-Address
For example, if your VM's public IP address is 134.199.194.177, you would connect using:
ssh root@134.199.194.177
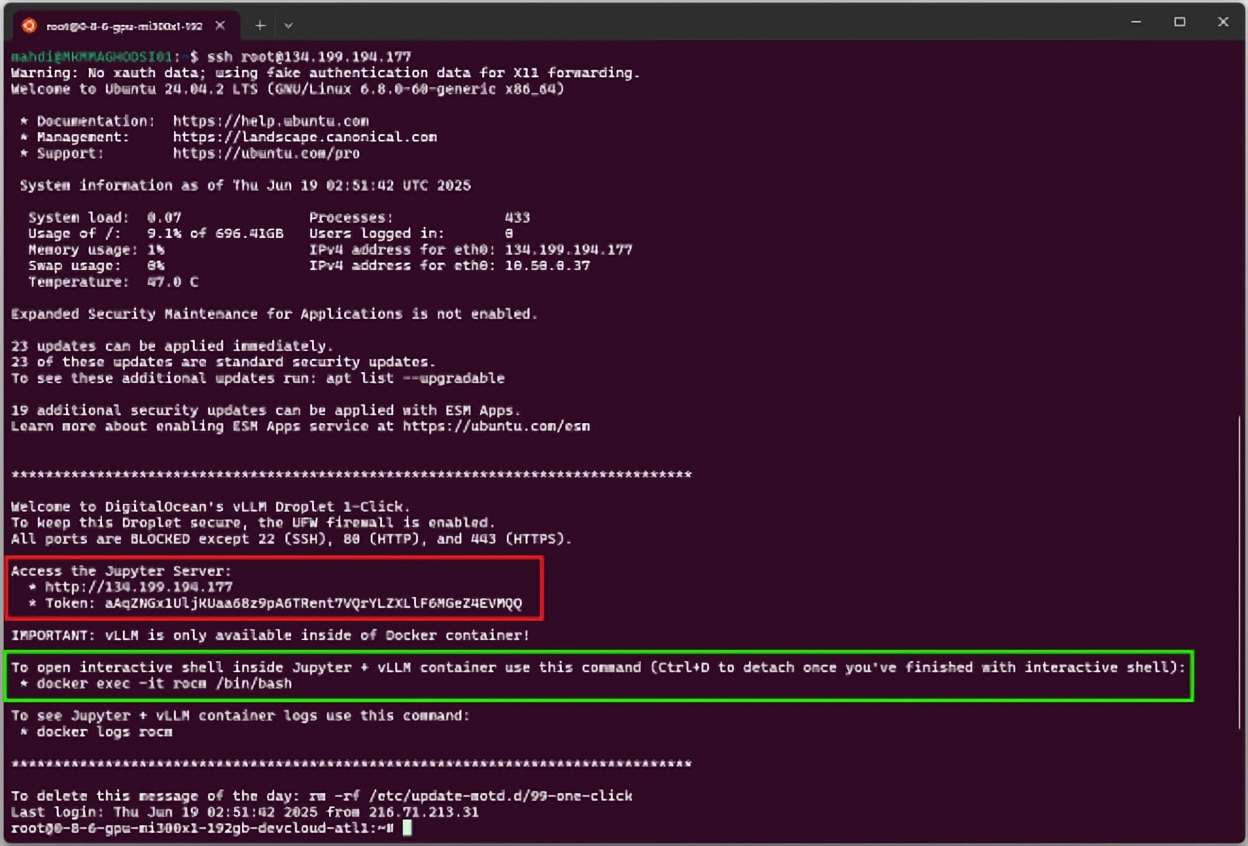
Figure 6: SSH Terminal
Upon successfully connecting to your VM, you'll see specific startup information for the image type you selected - in this example, vLLM.
As shown in Figure 6, the instructions for accessing the Jupyter Server are highlighted in the red box.
The steps for entering the Docker container with your selected package (e.g., vLLM), are highlighted in the green box.
4.2 Web Console
If you need quick access to your VM without opening a terminal on your local system, the Web Console lets you connect directly through your browser, offering a similar experience to SSH.
To open the Web Console, click the “Web Console” button at the top of your VM’s overview page. This will launch a new browser window displaying your VM’s console.

Figure 7: Web Console
4.3 JupyterLab
Quick Start images automatically launch a Jupyter server upon VM creation, allowing users to interact with their environment through the familiar JupyterLab interface. This is especially useful for those who prefer working in notebooks or want to run the preloaded tutorials included with some Quick Start package-based VMs.
To access JupyterLab after your VM is created, enter the public IP address of your VM into your browser. You’ll then be prompted to enter a unique token, which is displayed on the VM’s terminal welcome screen. You can retrieve this token by accessing the VM via SSH or the Web Console, as explained in Sections 4.1 and 4.2, and shown in Figure 6.

Figure 8: Enter Unique Token to Access Jupyterlab Environment
Note: For Quick Start Packages such as vLLM, Megatron, JAX, PyTorch, and SGLang, Jupyter is launched inside the Docker container to give users direct access to the selected AI/ML software stack.
For the Vanilla ROCm image, Jupyter is started directly on the base OS rather than in a container, as this image does not have any container pre-installed.
Ready to Use Jupyter Notebook Examples
As described in the previous section, VMs created from Quick Start packages, such as vLLM, come with a ready-to-use JupyterLab environment available immediately after VM creation. In addition, each image includes a set of example notebooks covering various relevant topics to help you get started quickly. These notebooks are continuously updated to reflect the latest developments.
In the next section, we’ll walk through one of the example notebooks included in the vLLM Quick Start image.
vLLM Notebook Example: AI Agent with MCPs using vLLM and Pydantic AI
Once you access the JupyterLab environment for the vLLM Quick Start image, you’ll see a list of ready-to-run notebooks on the left-hand side of the interface.
In this example, we’ll walk through one of the notebooks included in the current release, which demonstrates how to build a simple AI agent using vLLM, Pydantic AI, and MCP to help you find Airbnb listings based on your preferences.
1. Open the Notebook and Launch a vLLM Server:
Start by selecting the build_airbnb_agent.ipynb notebook from the left-hand panel in JupyterLab.

Figure 9: Building Your AI Agent With MCP Notebook Page
Once the notebook is open, follow the instructions in Step 1. In this step, you’ll open a new tab in JupyterLab by clicking the “+” button in the top toolbar.
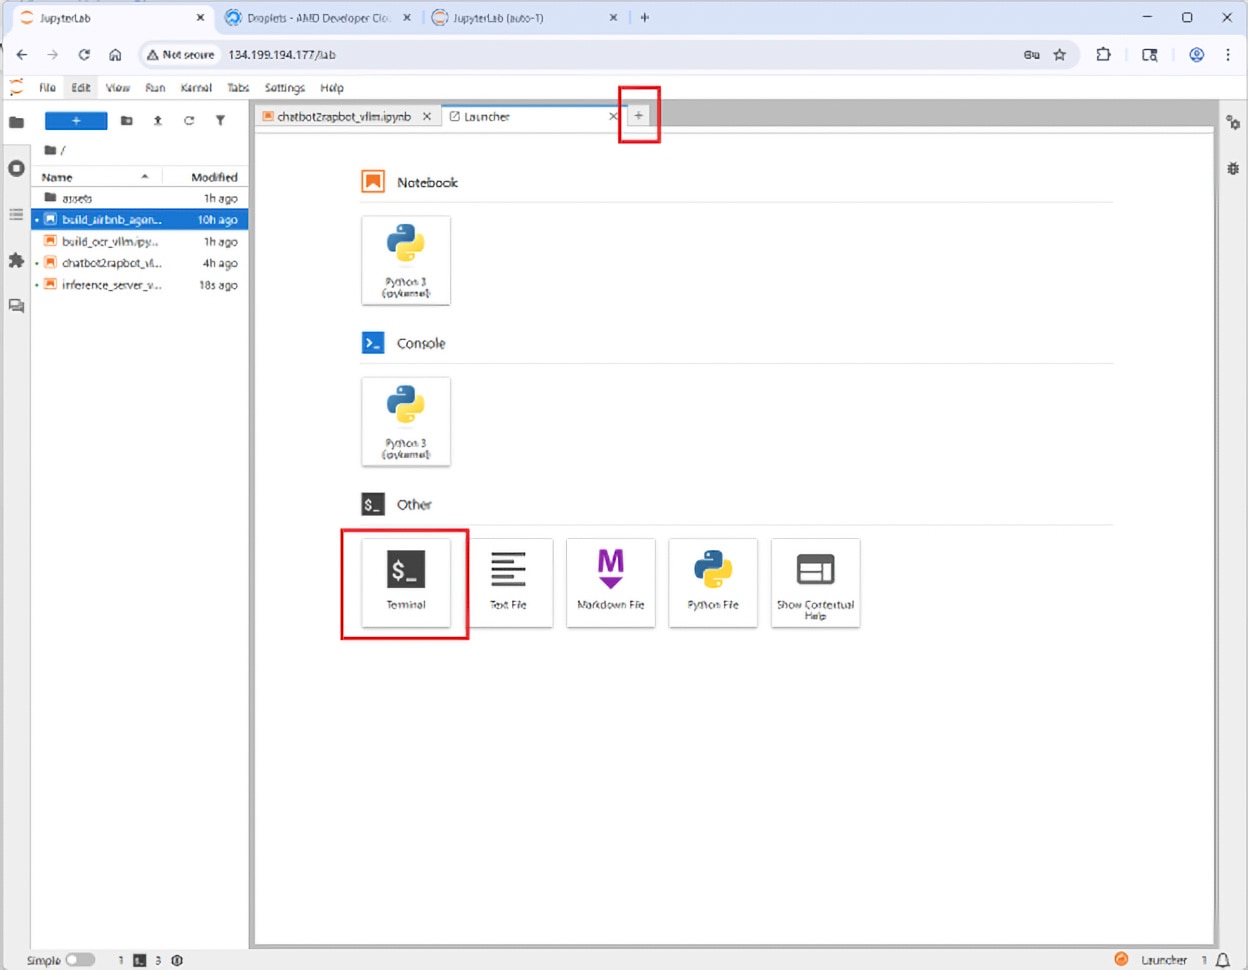
Figure 10: Launch A Fresh Terminal Window
Then, click the “Terminal” icon (as shown in Figure 10) to launch a fresh terminal window. From Step 1 of the notebook, copy the vLLM Serve command and paste it into this terminal to start the vLLM server.
After the model is downloaded and loaded, the server will be ready to accept traffic through an OpenAI-compatible endpoint.
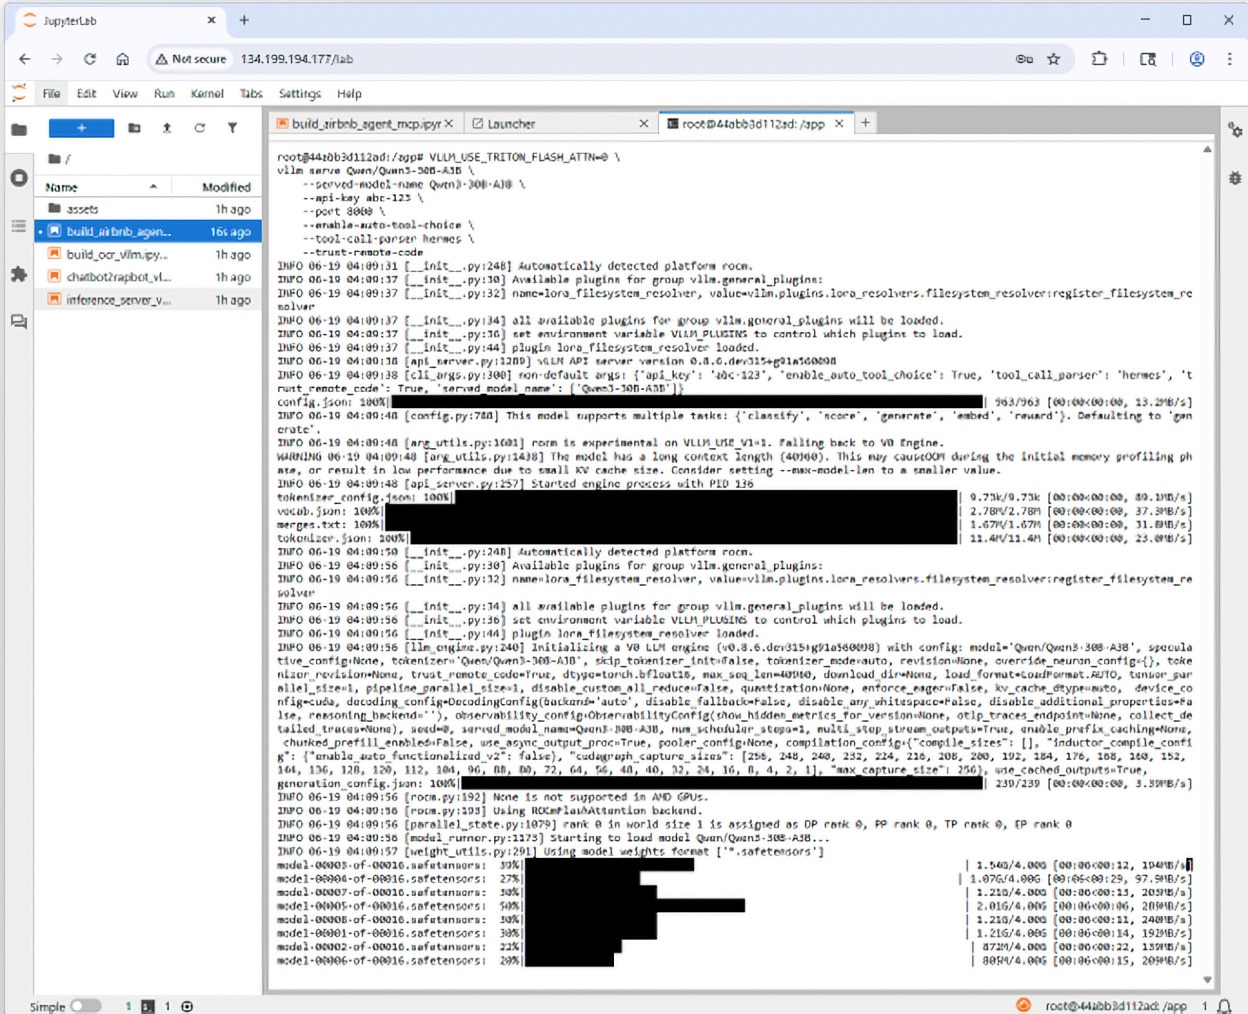
Figure 11: The server is up and running
Once the server is up and running, you’ll see a confirmation message indicating that it’s ready. At this point, you can return to the notebook tab and continue with the remaining steps.
2. Run Notebook Cells and Build Your AI Agent:
Once you're back in the notebook, you can go through the cells at your own pace, running them one by one. To execute a cell, either press Shift + Enter or click the Run (play) button in the top toolbar of the notebook.
Figure 12: Running Notebook cells
Get Started
Now it’s your turn.
AMD is offering an initial 25 hours of complimentary cloud credit to qualified developers who apply and are accepted.* To apply for an initial 25 complimentary credit hours from AMD, create your account, navigate to the “GPU Droplet Page” and fill out the credit request form shown below. Once your credit is granted, you will see a “credits applicable” message on your droplet page. If you run out of free credits, you may always request an increase by filling out the form again.
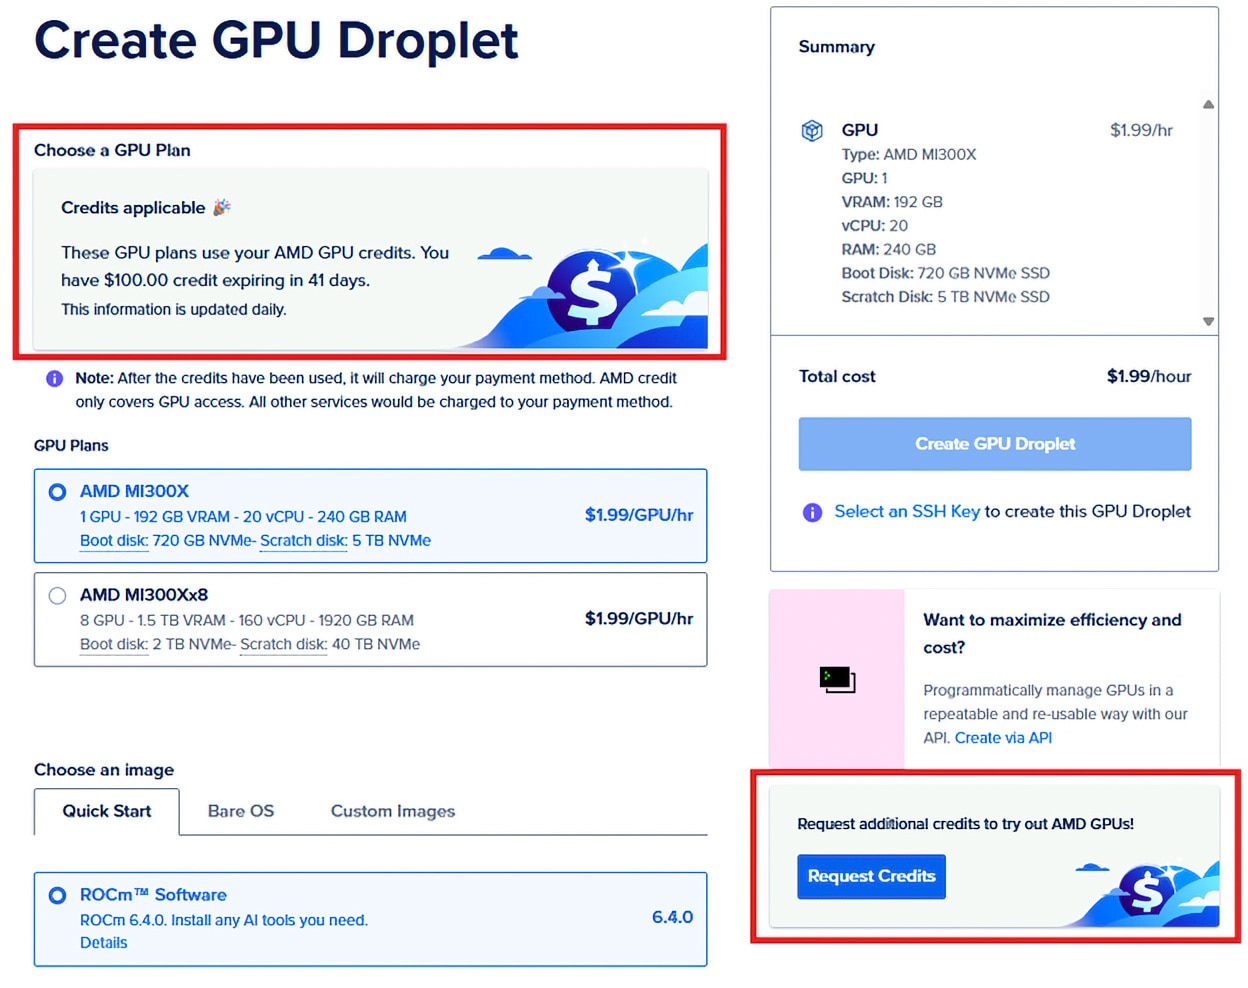
Figure 13: GPU VM page to Request Credits
Taking Advantage of Complimentary Credit
If you are approved for credit, you will have 10 days from date of credit approval to use your 25 hours. If complimentary credit hours are exhausted, you will lose access to the GPU and any and all data. Complimentary AMD cloud credit applies only to use on AMD Instinct MI300X GPUs. Complimentary credit hours for attached volumes, object storage, or backups, if any, on the AMD Developer Cloud will not be offered. Also note that when you power off your GPU VM, you are still billed for it. This is because your disk space, CPU, RAM, and IP address are all reserved, even while powered off. Therefore, charges are made until you destroy the instance. To take full advantage of your 25 hours, be sure to destroy your VM once your tasks or application are complete. If you need to pause your work and resume at a later time, you are able to take a snapshot of your current VM which will save your existing project. When you are ready to resume, create a new VM from your custom snapshot. See here to learn more about snapshots.
Conclusion
In this blog, we walked through the essential steps to help you get started on the AMD Developer Cloud — from creating your first VM and choosing the right image to accessing your environment via SSH, Web Console, or JupyterLab. We also explored the power of Quick Start images with preconfigured AI/ML frameworks like vLLM, and demonstrated how easy it is to run real-world use cases through ready-to-use example notebooks.
Whether you're building AI agents, fine-tuning models, or running inference at scale, the AMD Developer Cloud offers a flexible, developer-friendly environment powered by high-performance Instinct MI300X GPUs.
Join the AMD Developer Cloud today at https://devcloud.amd.com


Related Blogs
-
Introducing AMD ROCm™ Infera: Scaling Goodput for Agentic AI with Distributed Inference Orchestration — ROCm Blogs
Explore how AMD ROCm Infera orchestrates distributed inference to scale goodput for agentic AI on AMD Instinct GPUs.
July 22, 2026
-
Hyperloom - Autonomous Agentic Inference Optimization for AMD GPUs — ROCm Blogs
Hyperloom is a new open-source, agentic system aimed at automating the time-consuming task of optimizing end-to-end inference workloads.
July 22, 2026
-
Onboard and Deploy Custom Models in AMD AI Workbench — ROCm Blogs
Learn how to deploy custom models in AMD AI Workbench, utilizing the AIM Engine, orchestration, scaling, profile parameters and API keys.
July 22, 2026
-
Serve Kimi-K2.5-MXFP4 on MI355X with ATOM — ROCm Blogs
Serve Kimi-K2.5-MXFP4 on MI355X with ATOM and gfx950 block-scaled FP4 kernels for optimized LLM inference.
July 22, 2026
-
Deploy an Imaging AMD Solution Blueprint on AMD Radeon™ GPUs — ROCm Blogs
Learn how to deploy AMD Solution Blueprints on AMD Radeon™ GPUs by following a hands-on example of deploying the MRI Analysis Tool Solution Blueprint
July 21, 2026
-
Introducing ROCm™ AMD Infinity Context: A Purpose-Built KV Cache Tier for Distributed Inference — ROCm Blogs
Explore ROCm AMD Infinity Context (AIC), AMD's open KV cache tier built on AMD Infinity Storage for distributed LLM inference.
July 21, 2026
-
Efficient MiniMax-M3 Inference on AMD Instinct GPUs with ATOM and ATOMesh — ROCm Blogs
Serve and benchmark MiniMax-M3 on AMD Instinct MI355X GPUs using ATOM and ATOMesh with EAGLE3 speculative decoding.
July 20, 2026
-
Building a High-Performance Video Inference Pipeline with ROCm Libraries Using C/C++ — ROCm Blogs
Learn how to build a powerful, GPU-accelerated video analytics pipeline with ROCm, combining rocDecode for fast hardware video decoding and MIGraphX for efficient AI-powered analysis and inference.
July 20, 2026


尾註
Terms & Conditions of 25 Complementary Cloud Hours
AMD may provide an initial 25 hours or approximately $50 US worth of cloud credit. The complimentary 25 cloud credit hours for use on AMD Instinct MI300X GPUs on the AMD Developer Cloud may be granted to qualified developers in AMD’s sole discretion. Complimentary credit hours expire ten (10) days from the date of deposit in your developer cloud account.
To apply, visit the https://devcloud.amd.com and create a new account or log into an existing account to complete the "Request Credit" form. If your request is approved, an initial 25 hours of cloud credit will be added to your account. If the application is denied, you can still access AMD Instinct™ GPUs using the pay-as-you-go option, or you can reapply for credit.
If you are granted complimentary credit hours for use on Instinct GPUs in the AMD Developer Cloud and your credit card expires or is not valid for any reason, you will lose access to the GPU(s) and the data on the GPU(s). Similarly, if complimentary credit hours are exhausted, you will lose access to the GPU, any and all data, and the AMD Developer Cloud. Complimentary AMD cloud credit applies only to use on AMD Instinct MI300X GPUs. Complimentary credit hours for attached volumes, object storage, or backups, if any, on the AMD Developer Cloud will not be offered. When you power off your GPU VM, you are still billed for it. This is because your disk space, CPU, RAM, and IP address are all reserved, even while powered off. Therefore, charges are made until you destroy the instance.