Article Number: DH-020
This document provides information on the options available in Radeon™ WattMan1 which enables customization of graphics card (GPU) performance.
Overview
Radeon™ WattMan, which was first introduced in Radeon™ Software Crimson Edition 16.6.2. It provides performance tuning and monitoring of GPU behavior, enabling the ability to fine tune your gaming experience for different applications.
This document guides you through each step of tuning your GPU using Radeon WattMan. It is important to note that GPU tuning requires an advanced level of technical knowledge. For most users, the default hardware settings for the GPU and graphics memory provides the best performance for most applications.
NOTE! When manually overclocking, it is a best practice to overclock in small increments and then test for stability after each adjustment. This is best done by running your 3D games and applications as you normally would for a few hours. If the system becomes unstable (e.g., you may experience crashes, hangs, and/or graphical corruption), you should return to the last stable settings.
Radeon WattMan Requirements
Radeon™ WattMan is supported on AMD Radeon™ R7 260 Series graphics and higher. However, the availability of specific Radeon WattMan features will depend on the GPU being used. It is recommended to always use the latest compatible driver for your GPU when configuring Radeon Wattman on a Windows® based system.
NOTE! Radeon WattMan is not supported on APU Graphics (graphics integrated on a CPU) or AMD Graphics that are preinstalled in OEM systems.
Accessing Radeon WattMan
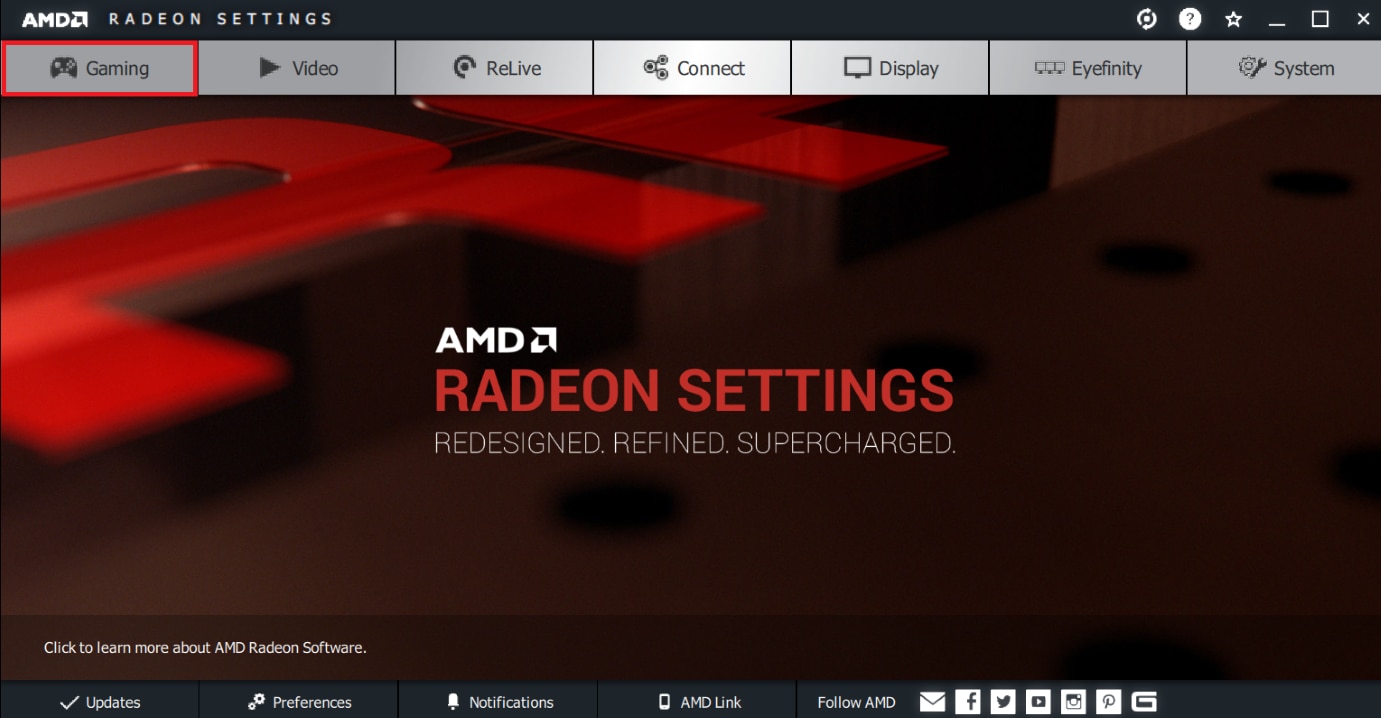
To access Radeon™ WattMan, open Radeon™ Settings by right clicking on your desktop and select AMD Radeon Settings.
Select the Gaming tab.
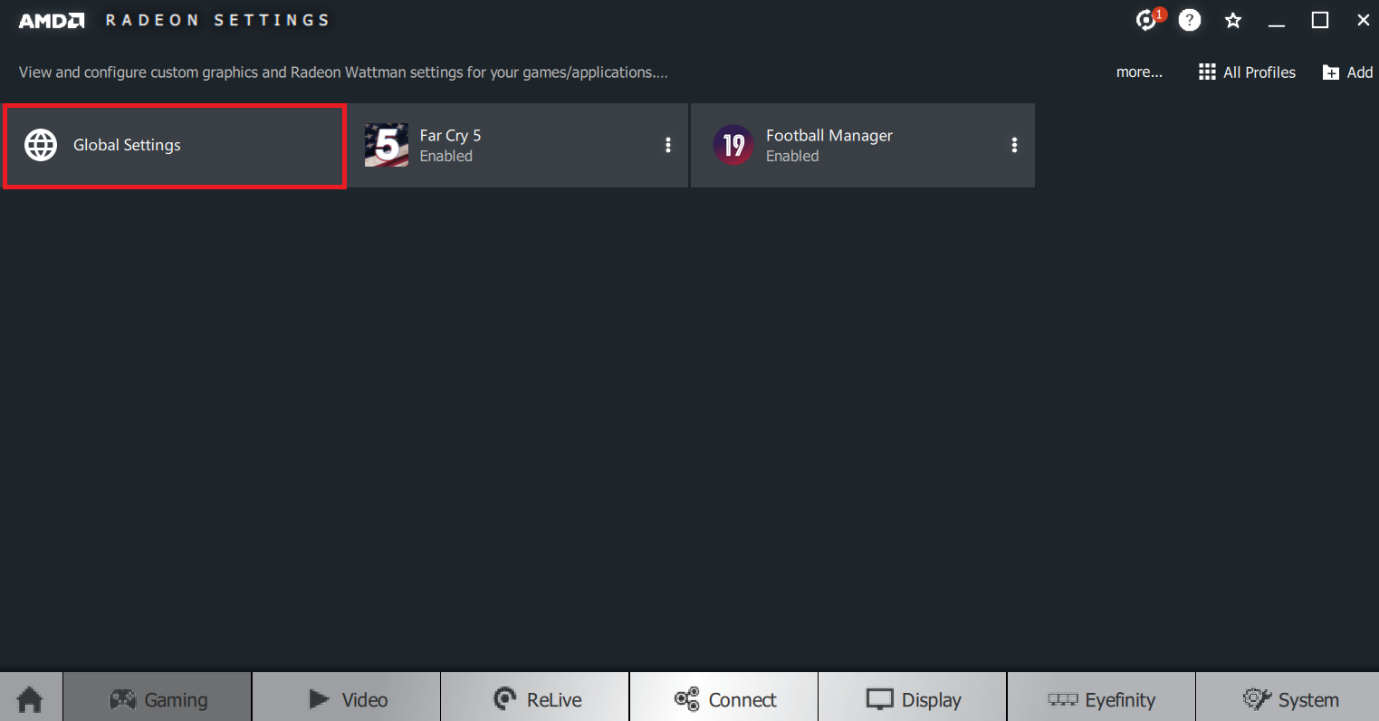
Select Global Settings.
Click on the Global WattMan tab and read the Terms of Use. If you agree to these terms, click Accept to continue.
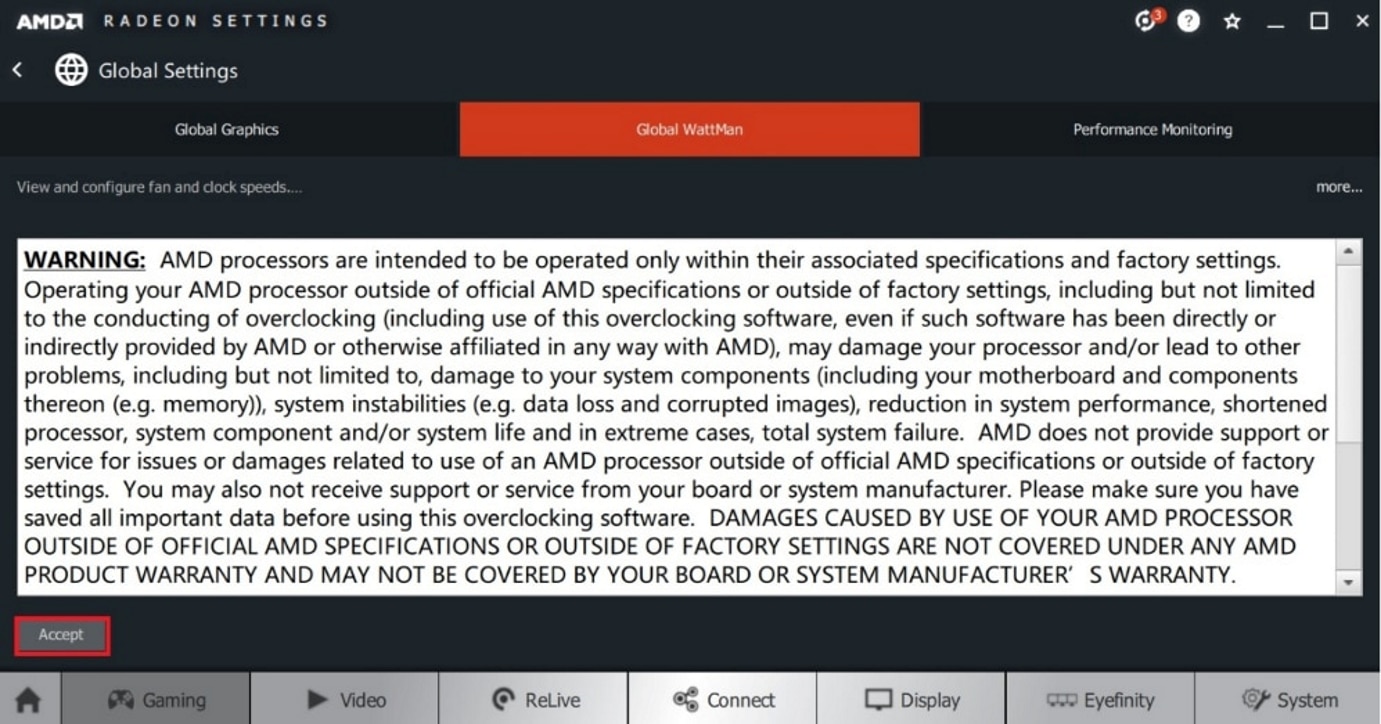
NOTE! AMD PRODUCT WARRANTY DOES NOT COVER DAMAGES CAUSED BY OVERCLOCKING, EVEN WHEN OVERCLOCKING IS ENABLED VIA AMD HARDWARE AND/OR SOFTWARE. DO NOT ACCEPT THESE TERMS IF YOU UNLESS YOU AGREE TO VOID YOUR WARRANTY.
After accepting the Terms of Use, you can begin configuring Radeon WattMan settings.
Configuring Radeon WattMan
The following section describes the options available within Radeon™ WattMan which allow performance tuning and monitoring of your GPU. These include:
- Performance/Watt Profiles
- Tuning Control
- Frequency/Voltage Curve
- GPU Frequency
- GPU Voltage Control
- Memory Timing
- Memory Frequency
- Memory Voltage Control
- Fan & Temperature
- Zero RPM
- Minimum Acoustic Limit
- Power Limit
- Histogram
NOTE! The availability of specific Radeon WattMan features will depend on the GPU being used.
NOTE! Global WattMan changes will apply to all 3D applications. If you wish to create an individual Radeon WattMan profile for a specific 3D application(s), please refer to Creating Application Profiles section of article: How to Configure AMD Radeon Settings to Get the Optimal Gaming Experience
NOTE! Changes made under Global WattMan will take effect immediately. Any changes made to settings within Radeon WattMan are only saved when you click Apply, located in the upper right corner of the Radeon WattMan interface.
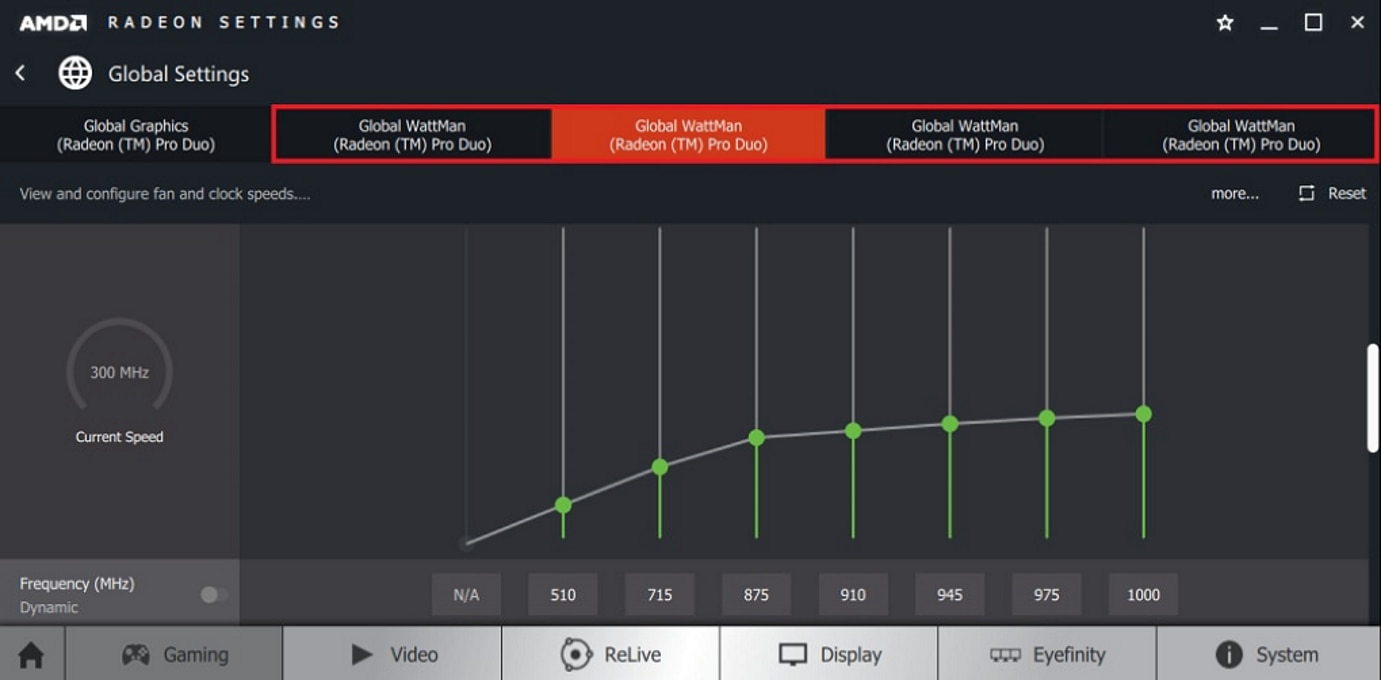
NOTE! In AMD CrossFire™ configurations, Radeon WattMan settings must be applied to each GPU in the system. You can select each GPU by clicking the GPU tabs as highlighted below. If after configuring the primary GPU, the options under the tab(s) for the remaining GPUs are disabled (greyed out), you may need to wake up the GPU(s). This can be done by cycling between the tabs highlighted below.
Performance/Watt Profile:
This feature provides three preset profiles for the GPU performance and power draw, and a Custom option for additional tuning control (see Tuning Control). Performance/Watt Profile is available only on Radeon™ RX Vega 64 and RX Vega 56 Series graphics.
Performance/Watt Profile offers the following presets:
- Power Save
- Balanced
- Turbo
- Custom
Select a Performance/Watt profile using the slider and then click Apply.
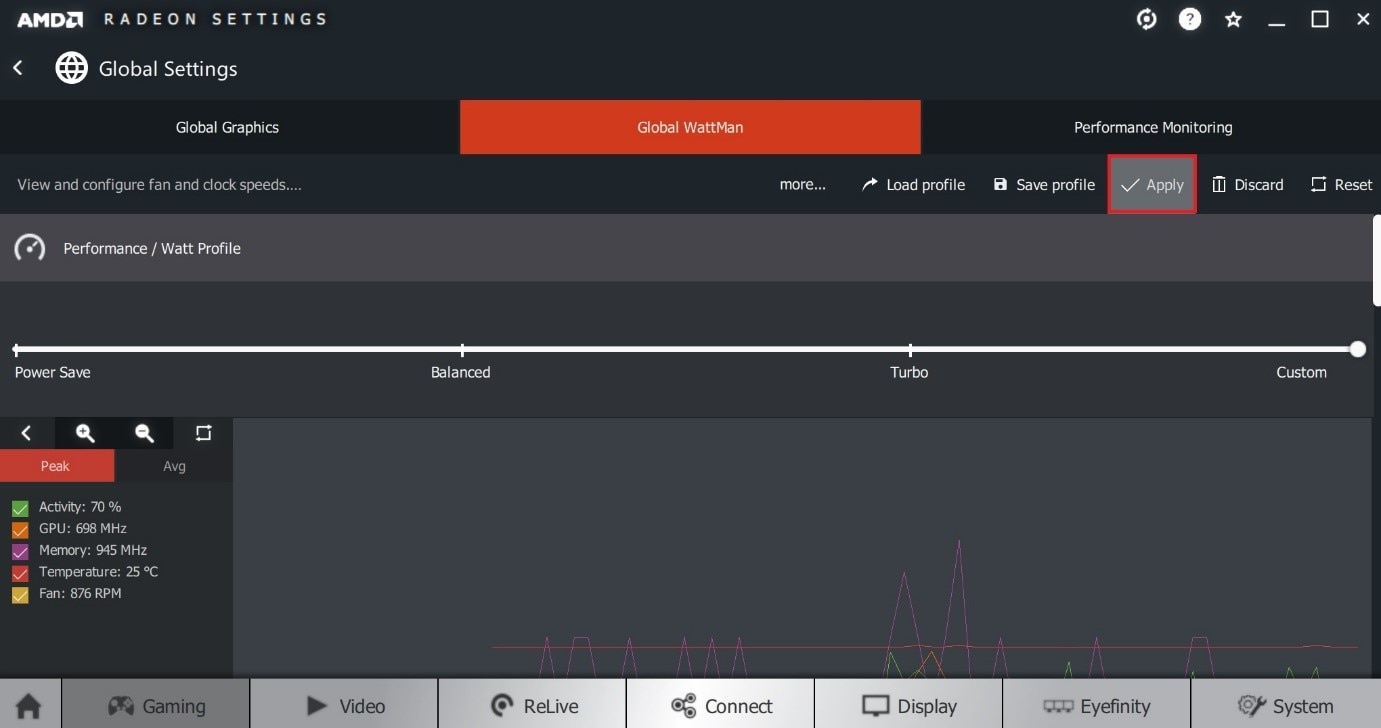
NOTE! Performance/Watt Profile only supported on Radeon™ RX Vega 64 and RX Vega 56 Series graphics.
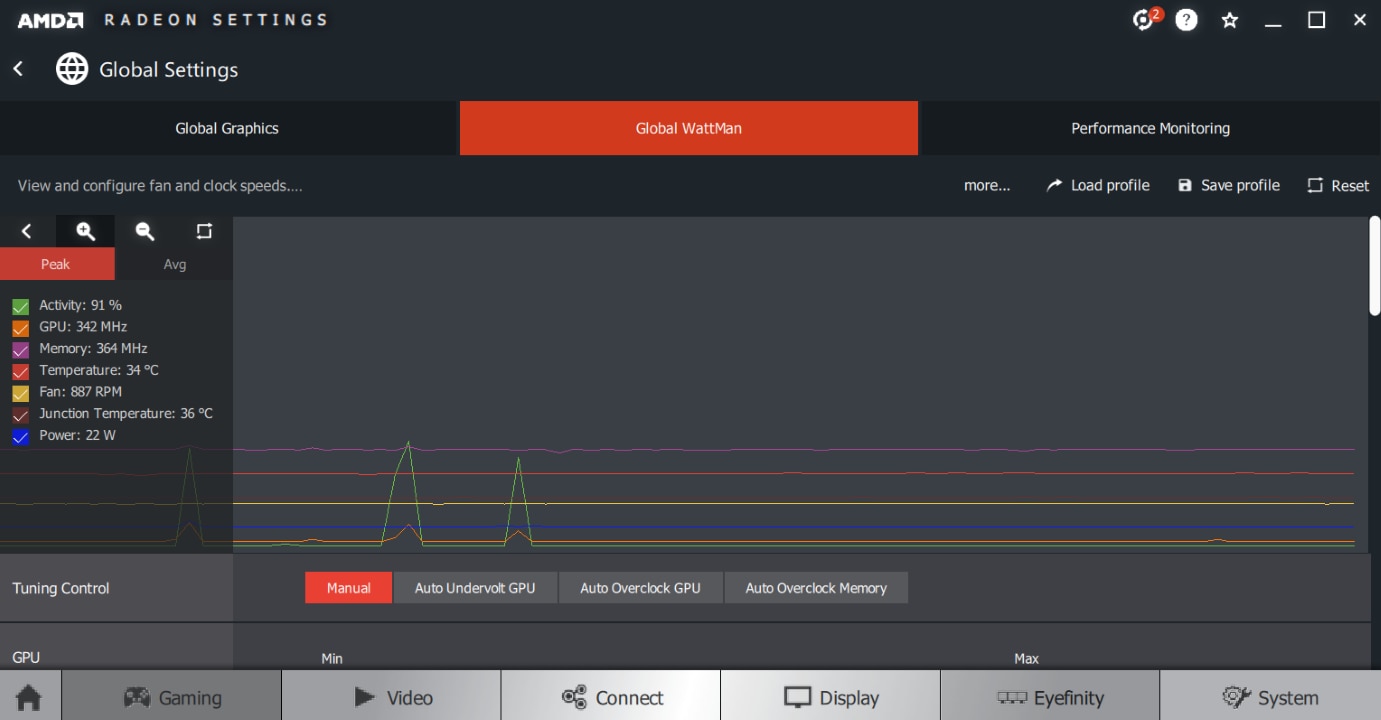
Tuning Control:
This feature allows Radeon™ WattMan to dynamically calculate suitable overclock settings for your system. Selecting an automatic tuning control option will disable some Radeon WattMan settings. To revert changes and re-enable features, select the Manual option.
Tuning Control is currently supported on Radeon™ VII, Radeon™ RX 5700 Series, and Radeon™ RX Vega 64 and RX Vega 56 Series graphics. For Radeon™ RX Vega 64 and RX Vega 56 Series graphics, the Performance/Watt profile must be set to Custom for Tuning Control options to become available.
Tuning Control provides the following options:
- Manual: Default setting
- Auto Undervolt: Reduces voltage while maintaining the same clock frequency in order to improve performance per watt.
- Auto Overclock GPU: Runs a GPU-based algorithm to automatically overclock the GPU to improve performance.
Auto Overclock Memory: Runs a memory-based algorithm to overclock the video memory to improve performance.
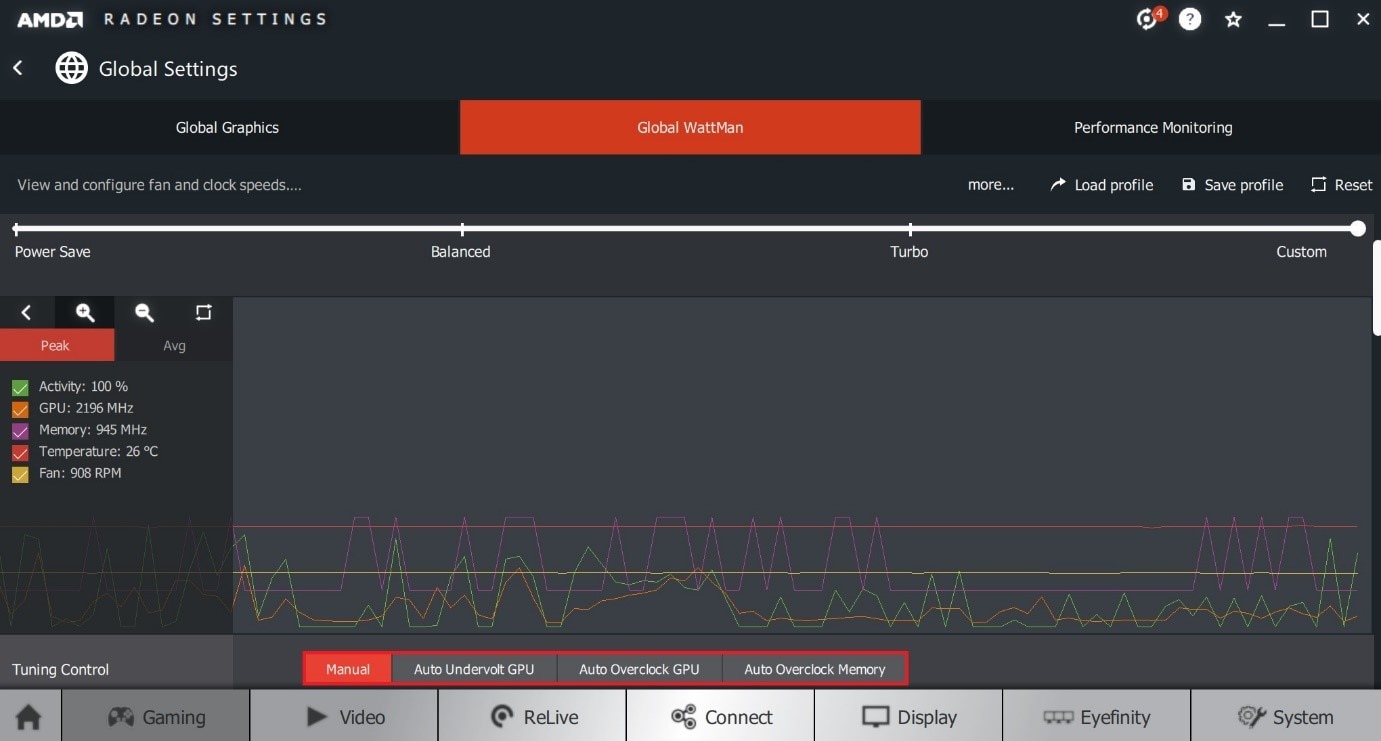
Select the desired Tuning Control option, read warning message, click Continue to apply the changes or Cancel to return to the previous menu.

NOTE! Tuning Control is currently supported on Radeon™ VII, Radeon™ RX 5700 Series, and Radeon™ RX Vega 64 and RX Vega 56 Series graphics.
Frequency/Voltage:
This feature when set to Manual mode, provides the option to set the GPU frequency and voltage relative to each other on a graph which is represented as a frequency/voltage curve. Frequency/Voltage feature is only available for Radeon™ VII and Radeon™ RX 5700 Series graphics.
Each dot along the curve can be moved up/down to set the GPU voltage in mV. The white bars on the left and right of the graph represents the minimum and maximum GPU frequency in MHz and can be adjusted by moving them left or right. The minimum and maximum GPU frequency values can also be manually entered in the boxes below the graph.
To adjust Frequency/Voltage, toggle the Frequency/Voltage option to change it from Auto to Manual. Set the desired frequency and voltage, then click Apply to save the changes.
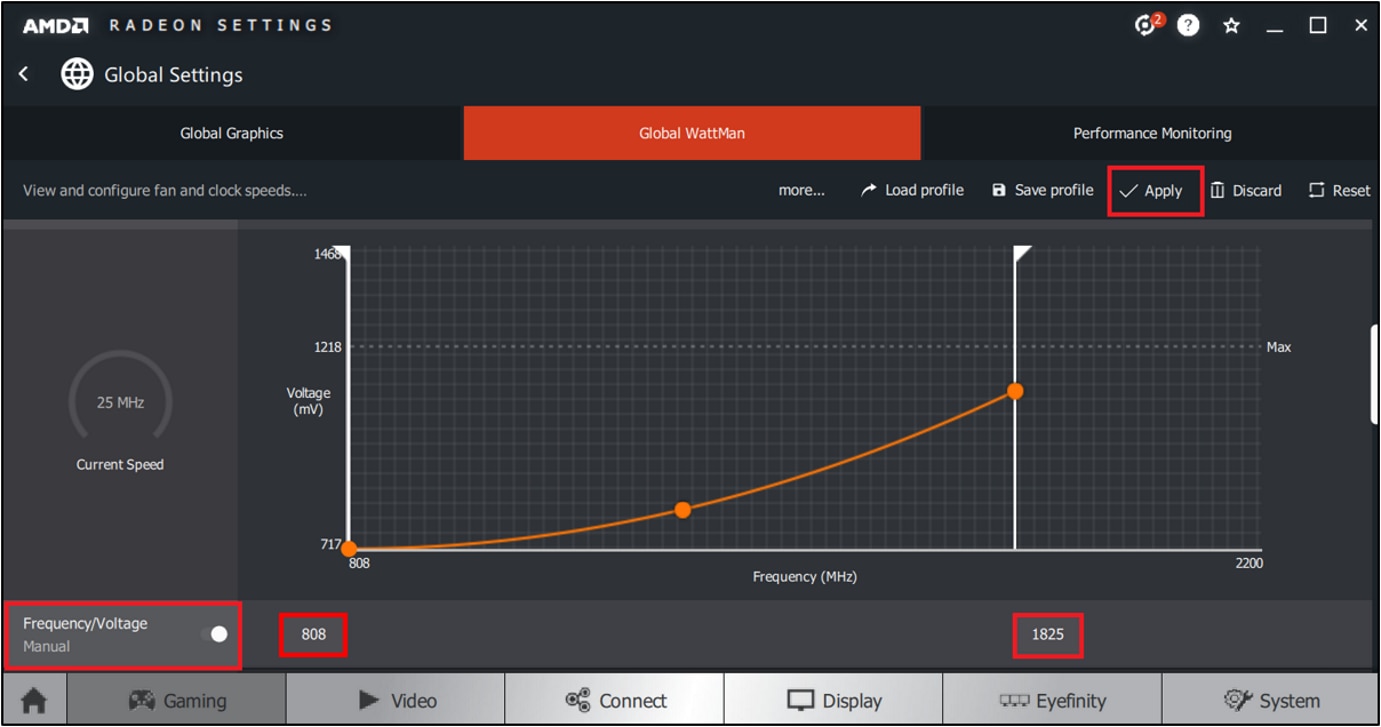
NOTE! Frequency/Voltage is supported on Radeon™ VII and Radeon™ RX 5700 Series graphics
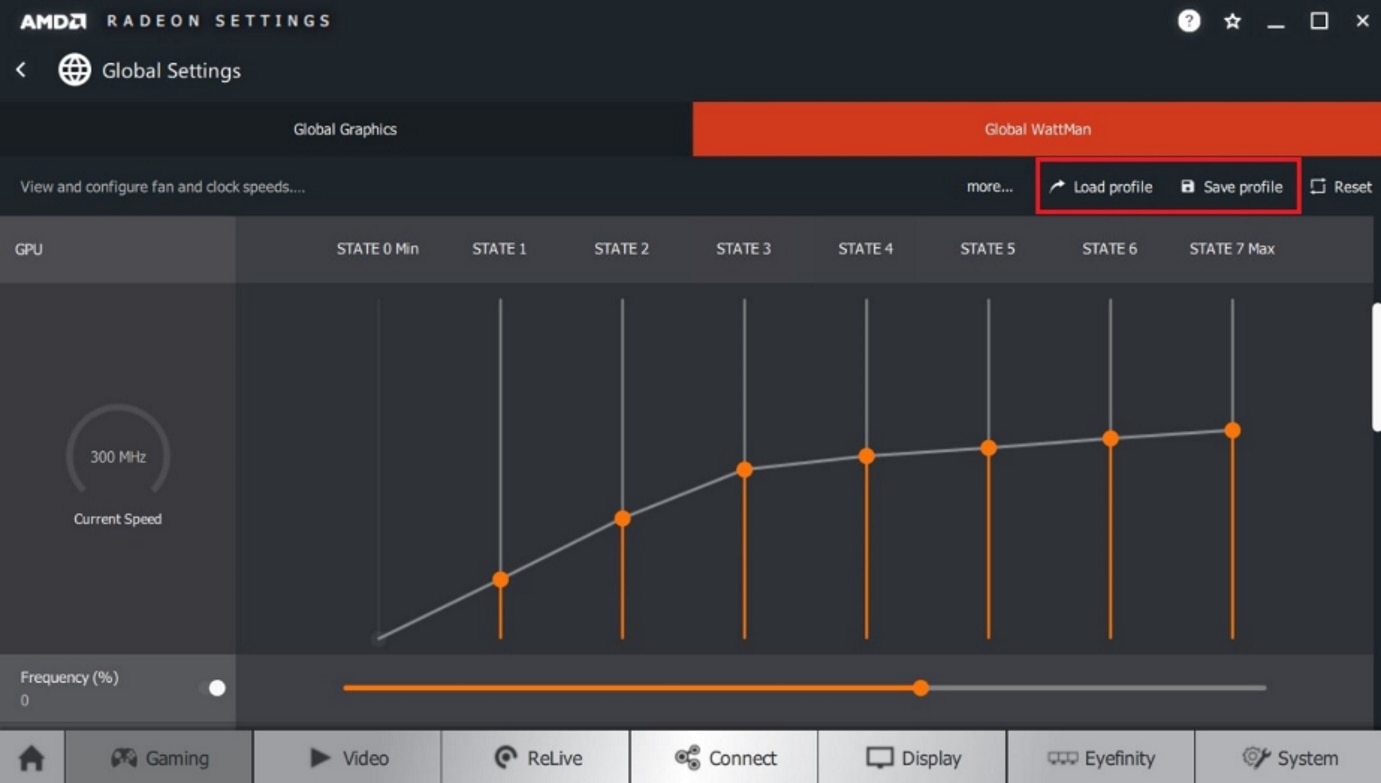
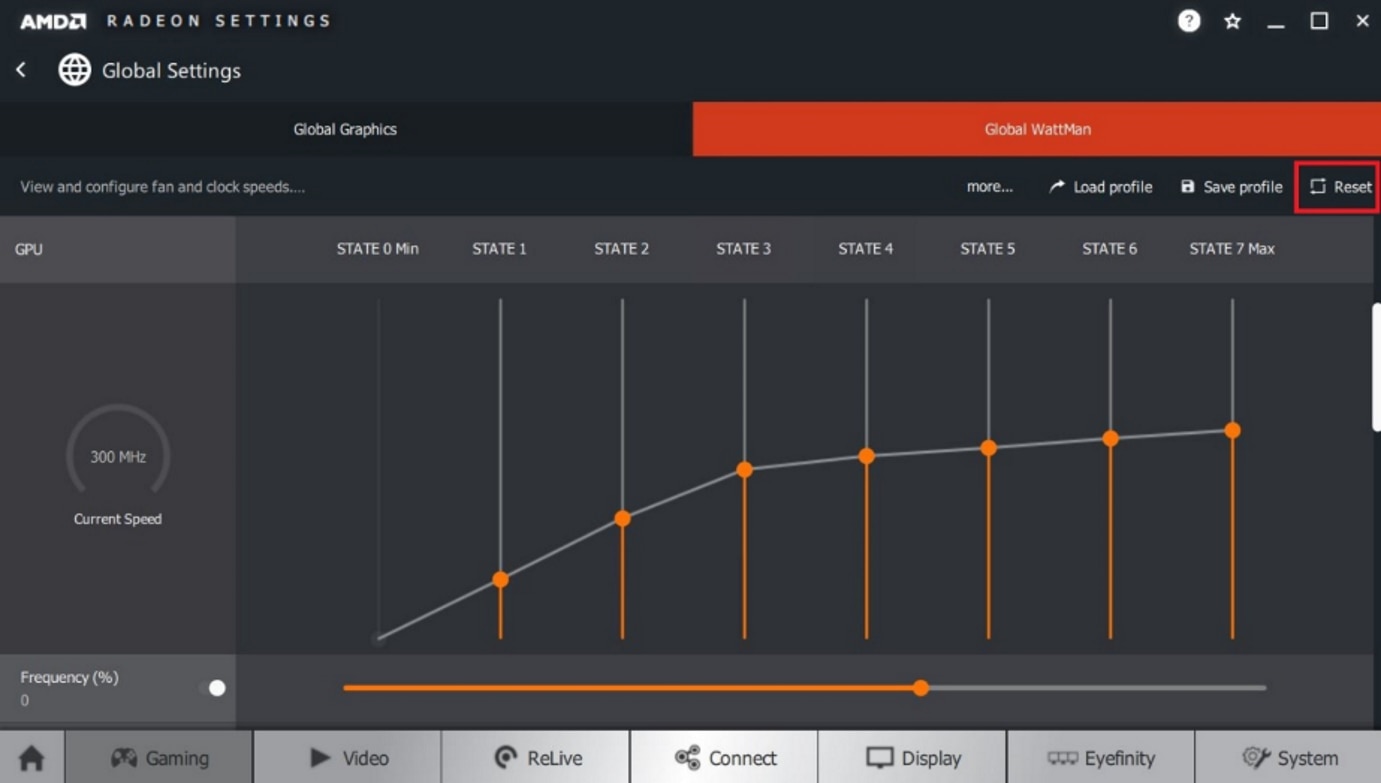
GPU Frequency:
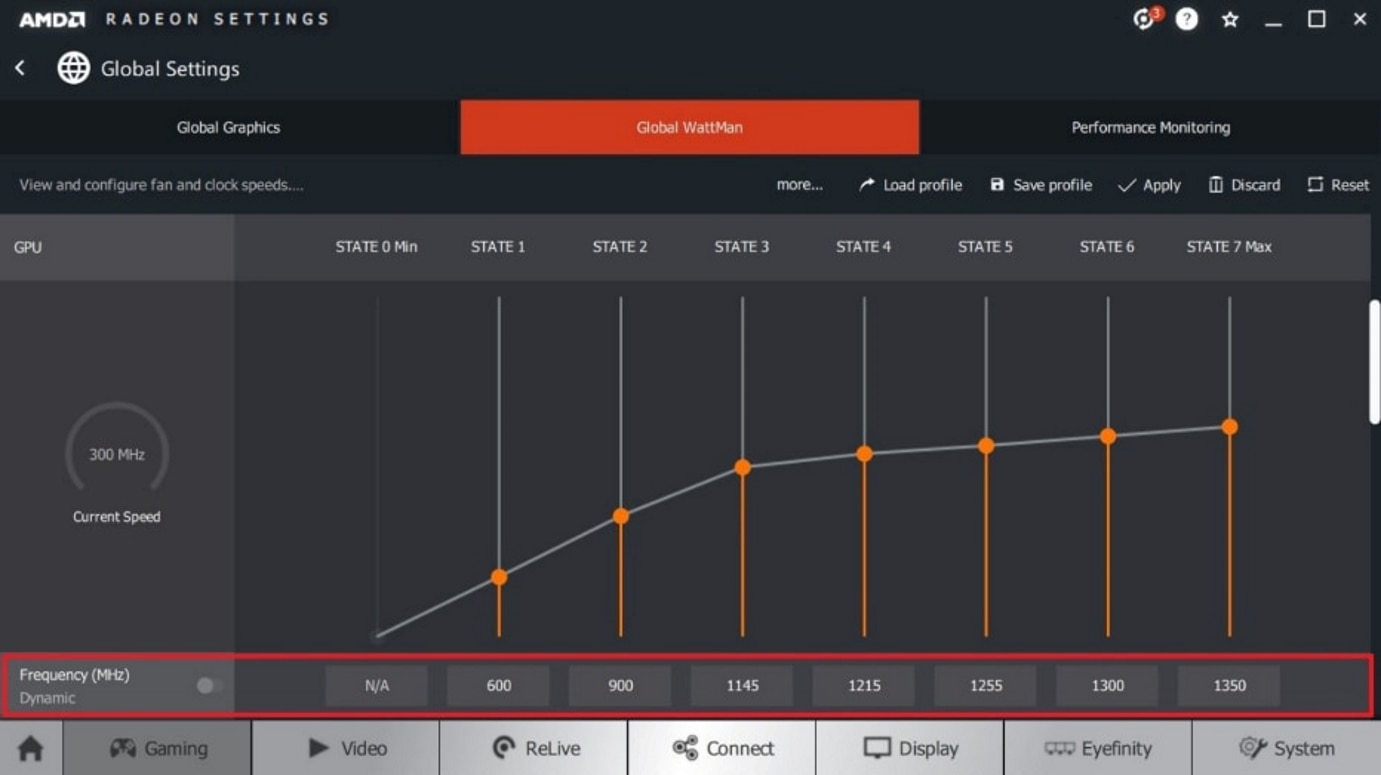
Radeon™ WattMan allows customization of seven GPU performance clock states, which are defined by clock speeds and voltages. Using GPU Frequency option, you can configure each of these seven States to your own personal preference. The highest performance GPU clock state is State 7, whereas State 0 is the lowest power state and cannot be modified.
NOTE! This feature is not available for Radeon™ VII and Radeon™ RX 5700 Series graphics.
GPU Frequency option offer two different modes for adjusting GPU clocks, these are:
- Frequency %: Adjust the GPU clock speeds using a percentage slider. A change in Frequency (%) is applied to all seven States simultaneously.
- Frequency (MHz): Adjust the clock speed in megahertz for each seven States individually. This mode allows offers greater customization of performance and can be accessed by toggling the Frequency button.
In Frequency (%) mode (default mode), move the slider right or left to increase or decrease the GPU frequency in increments of 0.5%.
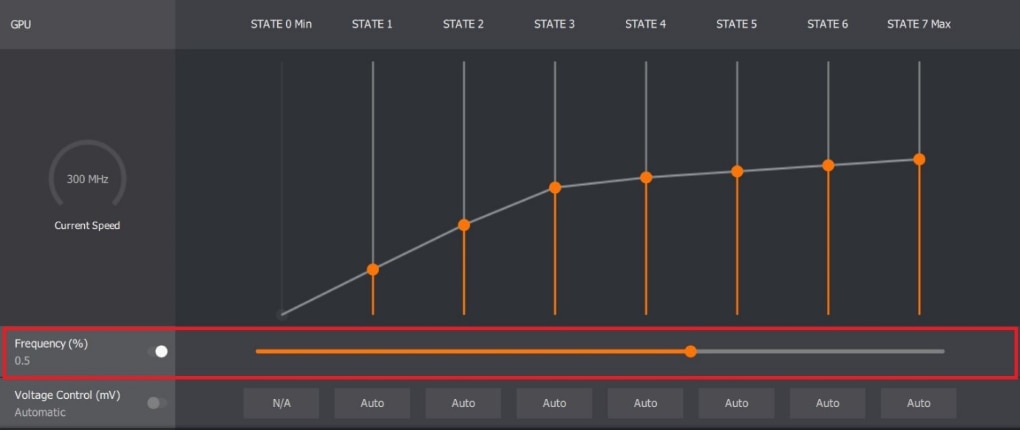
In Frequency (MHz) mode, set the desired frequency for each clock state and click Apply. In this example, the default base clock for State 7 for this GPU is 1340Mhz and has been increased to 1350Mhz.
NOTE! This feature is not available for Radeon™ VII and Radeon™ RX 5700 Series graphics.
NOTE! Increasing the clock frequency can impact stability and may require increasing the voltage to stabilize the system
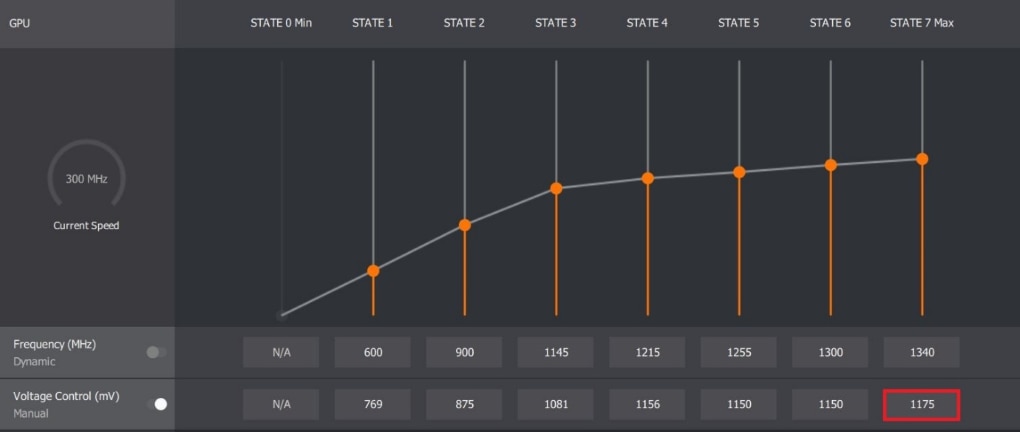
GPU Voltage Control:
GPU Voltage Control when set to Manual mode provides the option to set the amount of voltage applied to the GPU for each clock state. This can help to stabilize the GPU when increasing clock frequency but will require more power and generate more heat, resulting in higher fan speeds and potentially higher fan noise.
NOTE! This feature is not available for Radeon™ VII and Radeon™ RX 5700 Series graphics.
To enable Manual mode, toggle the GPU Voltage Control button, changing it from Auto to Manual. In Manual mode, each GPU clock state can be adjusted in small increments, the value is represented in millivolts (mV).
Set the desired voltage(s) and click Apply. In this example, the default voltage for State 7 is 1150mV and has been increased to 1175mV.
NOTE! This feature is not available for Radeon™ VII and Radeon™ RX 5700 Series graphics.
NOTE! It is a best practice to increase voltage in small increments and then test for stability. This can be done by running your 3D games/applications at your preferred settings. If the adjustments made above causes stability issues, you can restore factory default settings by clicking Reset located in the upper right-hand corner.
NOTE! Voltages are not shared between GPU and Memory Clocks; both are set independently.
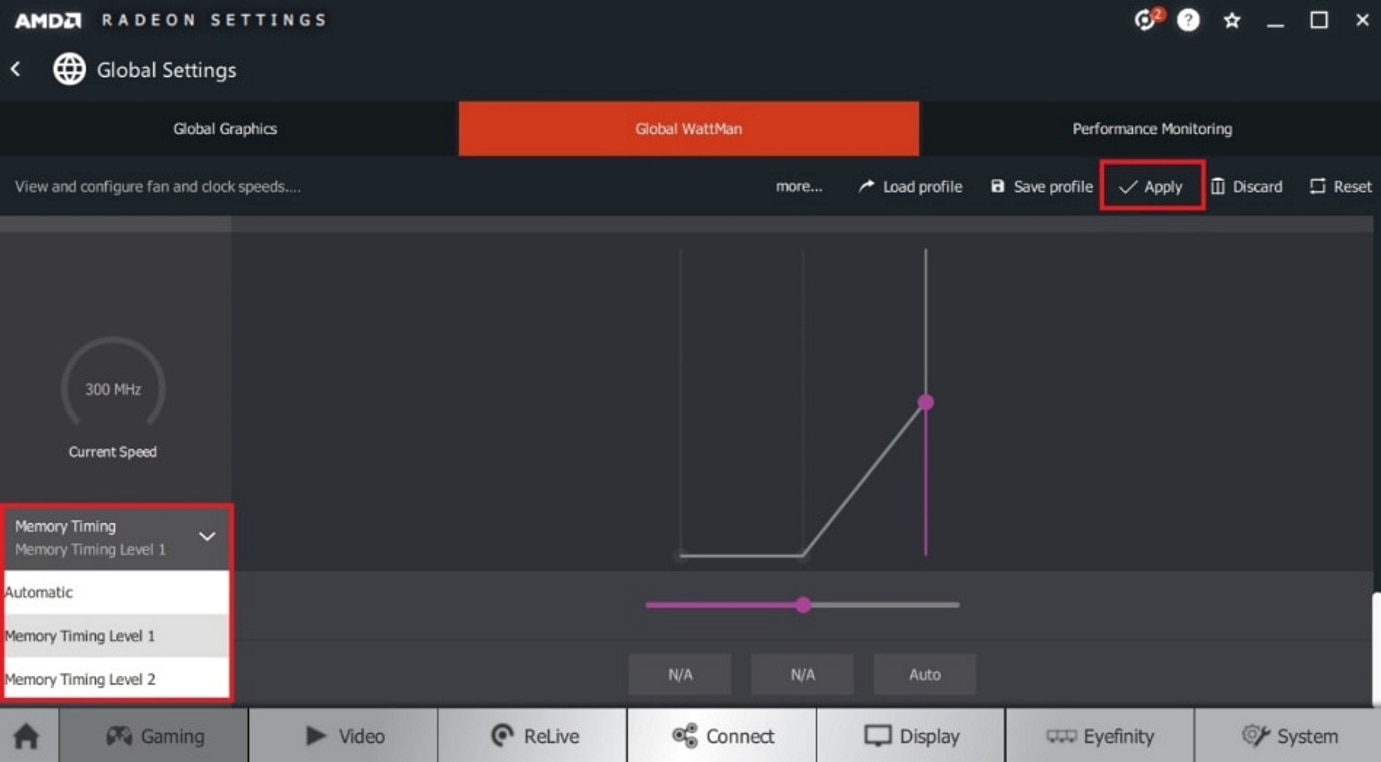
Memory Timing:
Memory Timing reduces memory latency based on the selected level. A lower memory latency level may improve performance in some applications. This option is only available on Radeon™ VII, Radeon™ RX Vega 64 and RX Vega 56, and Radeon™ RX 500 Series and RX 400 Series graphics.
Memory Timing provide three presets:
- Automatic (default)
- Memory Timing Level 1
- Memory Timing Level 2
Click Memory Timing to switch between Memory Timing Levels. Click Apply to save your changes.
NOTE! Memory Timing option is only available on Radeon™ VII, Radeon™ RX Vega 64 and RX Vega 56, and Radeon™ RX 500 Series and RX 400 Series graphics.
Memory Frequency:
This option allows adjusting the frequency of the highest memory state, State 2 Max. In the default mode, the memory frequency for State 2 Max can be adjusted in increments of 5MHz using the vertical or horizontal sliders.
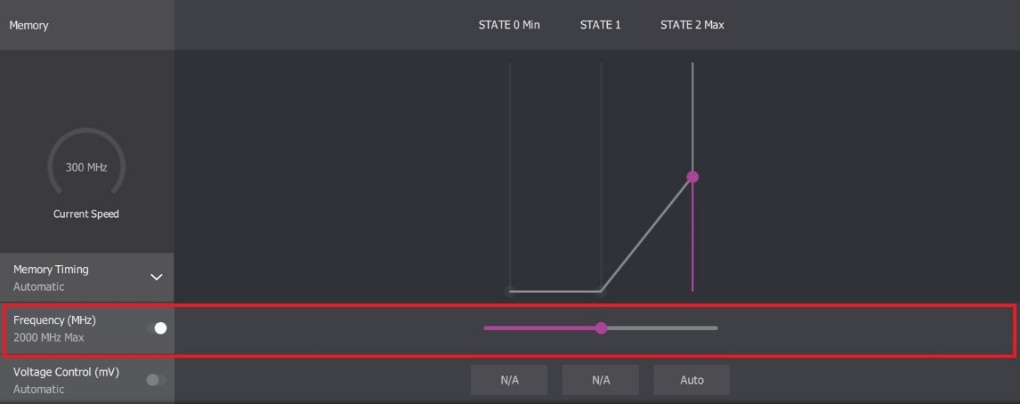
Toggling the Memory Frequency button changes the option to Dynamic mode. In Dynamic mode, the memory frequency value and can be manually entered in increments of 1MHz.
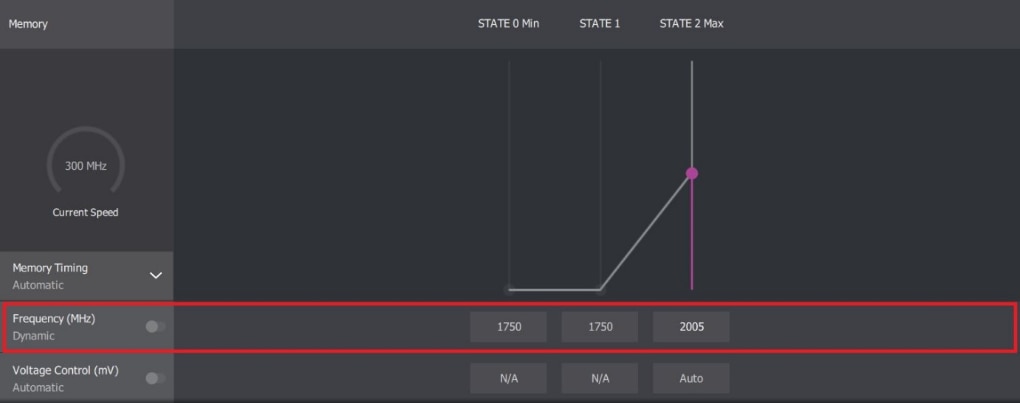
NOTE! Memory Frequency option is not available on AMD Radeon™ Pro Duo, Radeon™ R9 Fury Series, and Radeon™ R9 Nano Series graphics.
NOTE! For Radeon™ VII, Radeon™ RX 5700 Series, Radeon™ RX Vega 64 and RX Vega 56 Series graphics, the Memory Frequency option looks slightly different, but the adjustment mechanism is the same (as shown below).

Memory Voltage Control:
Memory Voltage Control when set to Manual mode provides the option to set the amount of voltage applied to the highest memory state, State 2 Max.
The desired voltage can be applied in increments of 1mV, click Apply to save changes. In this example, the default voltage for memory State 2 Max is 950 and has been increased to 1000.
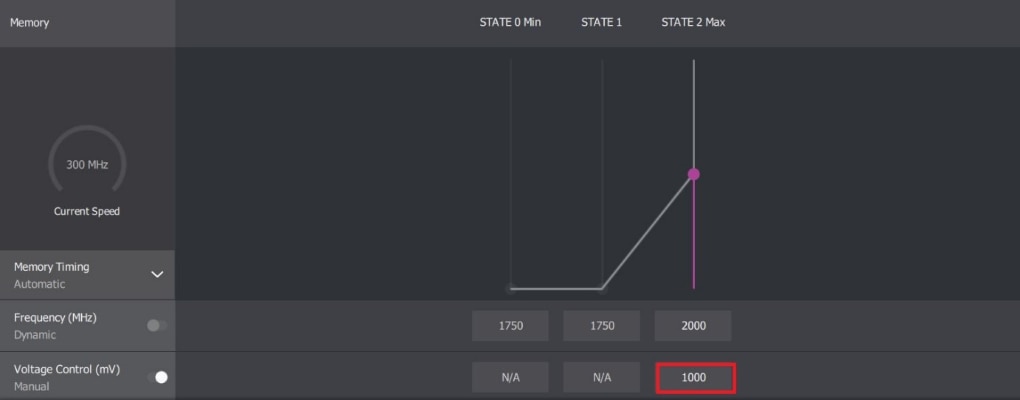
NOTE! Memory Voltage Control option is not available on Radeon™ VII, Radeon™ RX 5700 Series, Radeon™ RX Vega 64 and RX Vega 56, AMD Radeon™ Pro Duo, Radeon™ R9 Fury Series, and Radeon™ R9 Nano Series graphics.
Fan & Temperature:
Fan speed and temperature are automatically managed by your GPU and will ramp up or down to regulate temperature, depending on current workload. By default, the Speed/Temperature option is set to Automatic. Switching to Manual mode, by toggling the Speed/Temperature button, enables control over the fan speed based on the GPU operating temperatures.
Manual mode offers five customizable states along the GPU fan curve. Each dot along the curve can be moved up/down to control the GPU fan speed using PWM (Pulse Width Modulation, in percentage) and left/right for the desired GPU temperature.
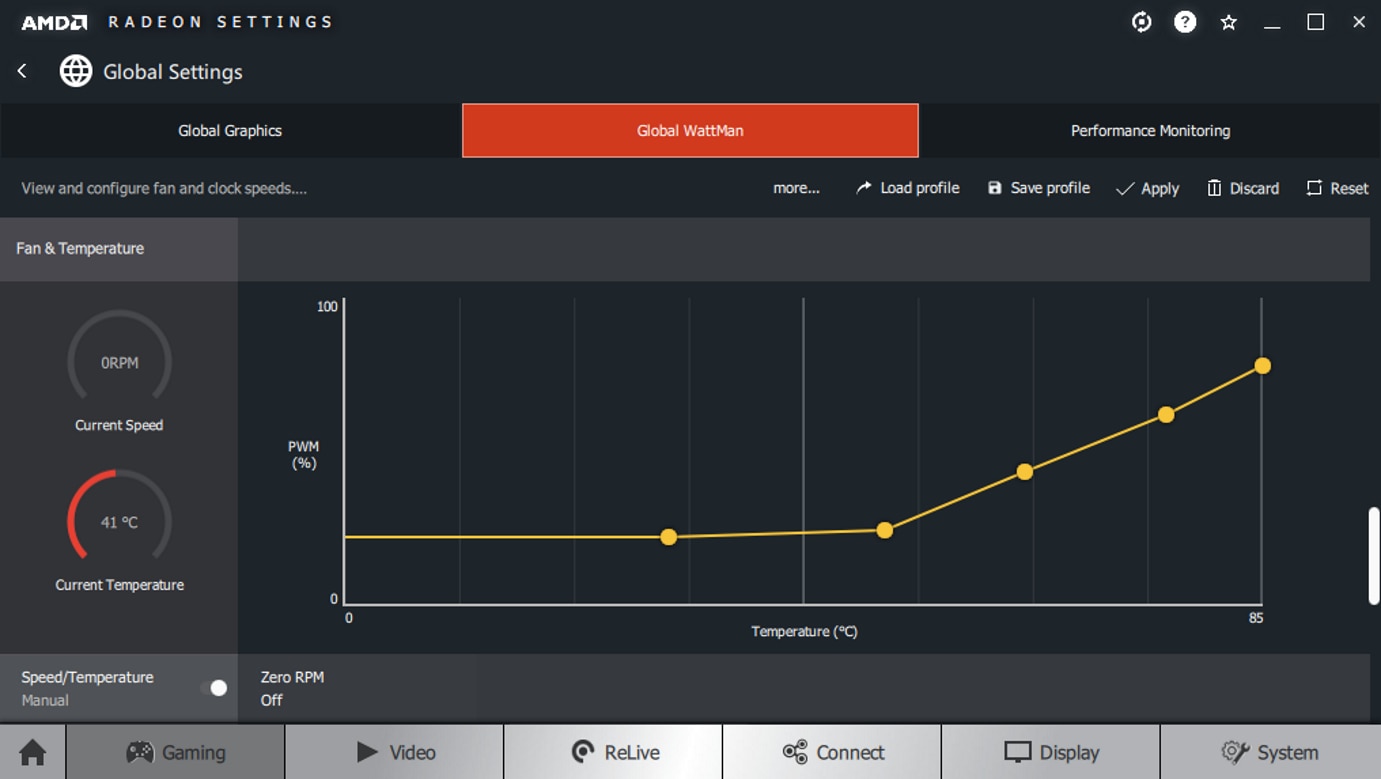
NOTE! Fan speed is measured in RPM (revolutions per minute), the higher the fan speed the more cooling provided, which may lead to an increase in fan noise.
Zero RPM:
Zero RPM enables quiet operation whilst the GPU is under light load and is enabled by default. The GPU fans should spin up as the GPU is put under load and temperature increases. Zero RPM is automatically disabled if any changes are made in Radeon™ WattMan.
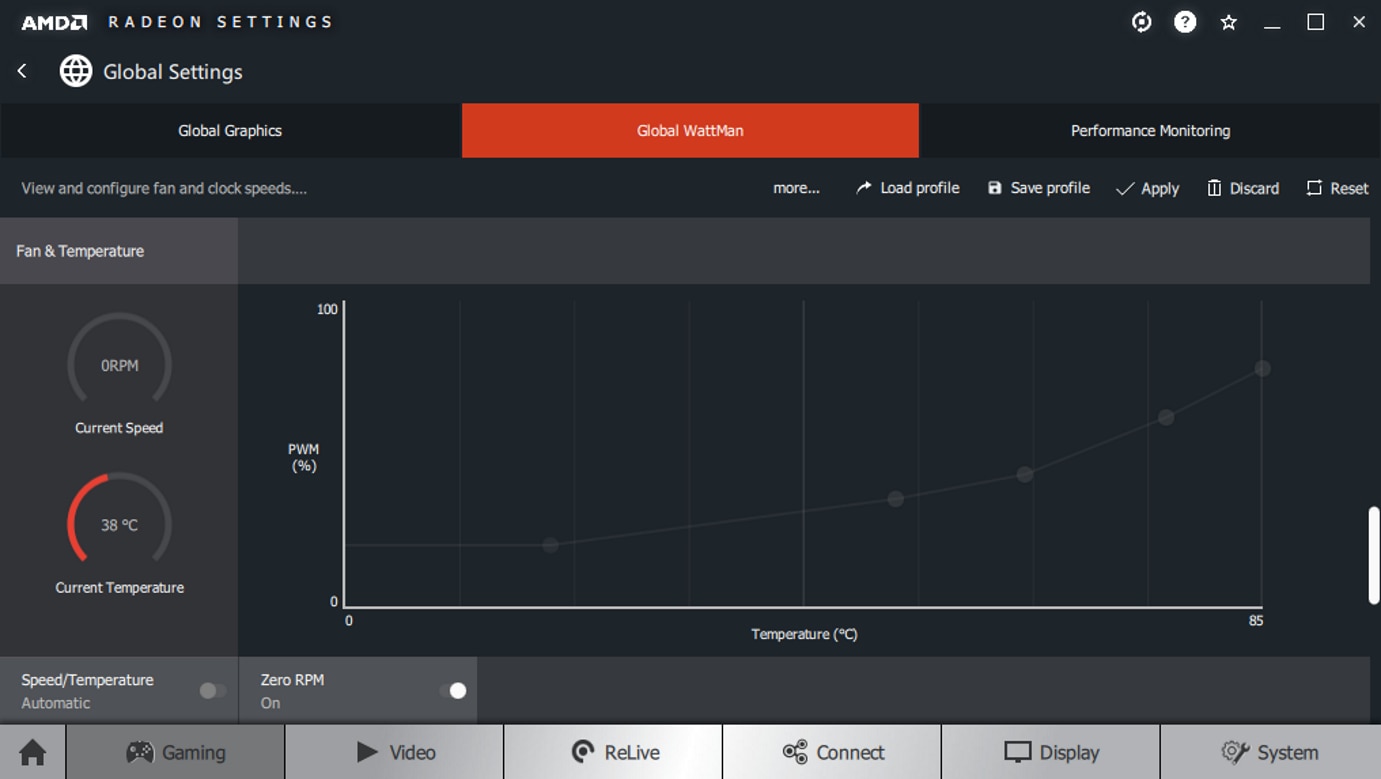
NOTE! Zero RPM is not supported on Radeon™ VII, Radeon RX 5700 Series, and Radeon™ RX Vega 64 Liquid Edition graphics.
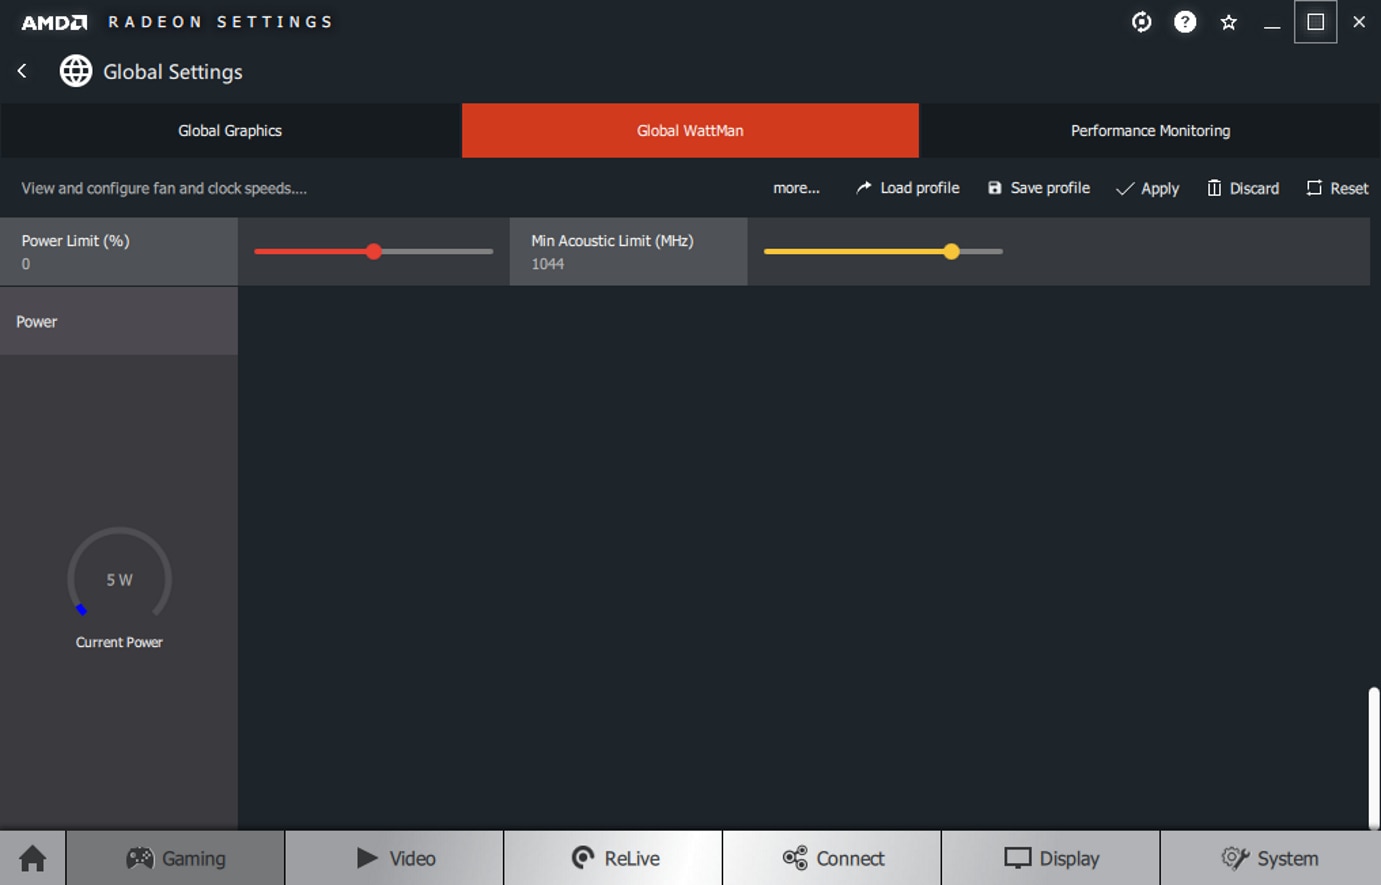
Minimum Acoustic Limit:
The feature allows setting the baseline frequency which the GPU will operate in. If the GPU clock frequency (MHz) drops below the minimum acoustic limit value set, the fan speed will increase as required to regulate the GPU temperature so that the baseline frequency can be maintained.

NOTE! Minimum Acoustic Limit is not supported on Radeon™ VII, Radeon™ RX 5700 Series, and Radeon™ RX Vega 64 Liquid Edition graphics.
Power Limit:
This feature controls the level of power sent to the GPU. Increasing this value can improve GPU performance by allowing the GPU to maintain its highest clock frequency (State 7).
Power Limit can be increased or reduced as a percentage and should be set to the maximum when increasing GPU or Memory clock frequency. Power Limit (%) range is dependent on the GPU.
Histogram
The Histogram allows monitoring and data capture of GPU activity, measuring the GPU temperature, power, fan speed and clock speeds.
Hover over the graph to view details for a specific point in time as shown below.
Radeon WattMan Profiles
After arriving at an optimal Radeon™ WattMan configuration, the settings can be saved as a profile.
Starting with Radeon™ Software Adrenalin Edition, multiple profiles can now be created and loaded depending on the system usage. For example:
- A profile for high performance gaming with a higher power limits and fan speed to maintain higher clock frequencies.
- A profile for reduced power usage and fan speeds resulting in lower temperatures and a quieter system.
In addition, Radeon WattMan profiles can also be created on a per application basis, providing the same set of customizable options as described above, via Gaming Application Profiles. When an application specific profile is loaded, it will override Global WattMan settings while that application is running.
For information on how to create an Application Profile, please refer to Creating Application Profiles section of article: How to Configure AMD Radeon Settings to Get the Optimal Gaming Experience
To load or save a Radeon WattMan profile (Global or Applications specific), click on the Load profile or Save profile buttons. Profiles (saved in XML format) are stored by default in the following location: <Drive>:\Users\<username>\Appdata\Local\AMD\CN.
1Overclocking any AMD processor, including without limitation, altering clock frequencies / multipliers or memory timing / voltage, to operate beyond their stock specifications will void any applicable AMD product warranty, even when such overclocking is enabled via AMD hardware and/or software. This may also void warranties offered by the system manufacturer or retailer. Users assume all risks and liabilities that may arise out of overclocking AMD processors, including, without limitation, failure of or damage to hardware, reduced system performance and/or data loss, corruption or vulnerability.