AI Unleashed: How AMD Ryzen™ AI Max+ Makes Supercomputing Personal
Oct 20, 2025

When the AMD Ryzen™ AI Max+ platform was first announced at CES 2025 - it marked a new chapter in personal computing: one where data-center class AI became accessible right on your desk at a minuscule fraction of the power and cost. Offering up to 96GB dedicated graphics memory (and a total of 112GB GPU addressable), the AMD Ryzen AI™ Max+ series of processors can run workloads that were originally designed with server hardware in mind.
Datacenter-grade AI for the x86 ecosystem
The best part? All of this AI capability is available inside the mature x86 ecosystem and the familiarity of Windows (Linux is also available) so you do not have to compromise on your non-AI personal computing needs.

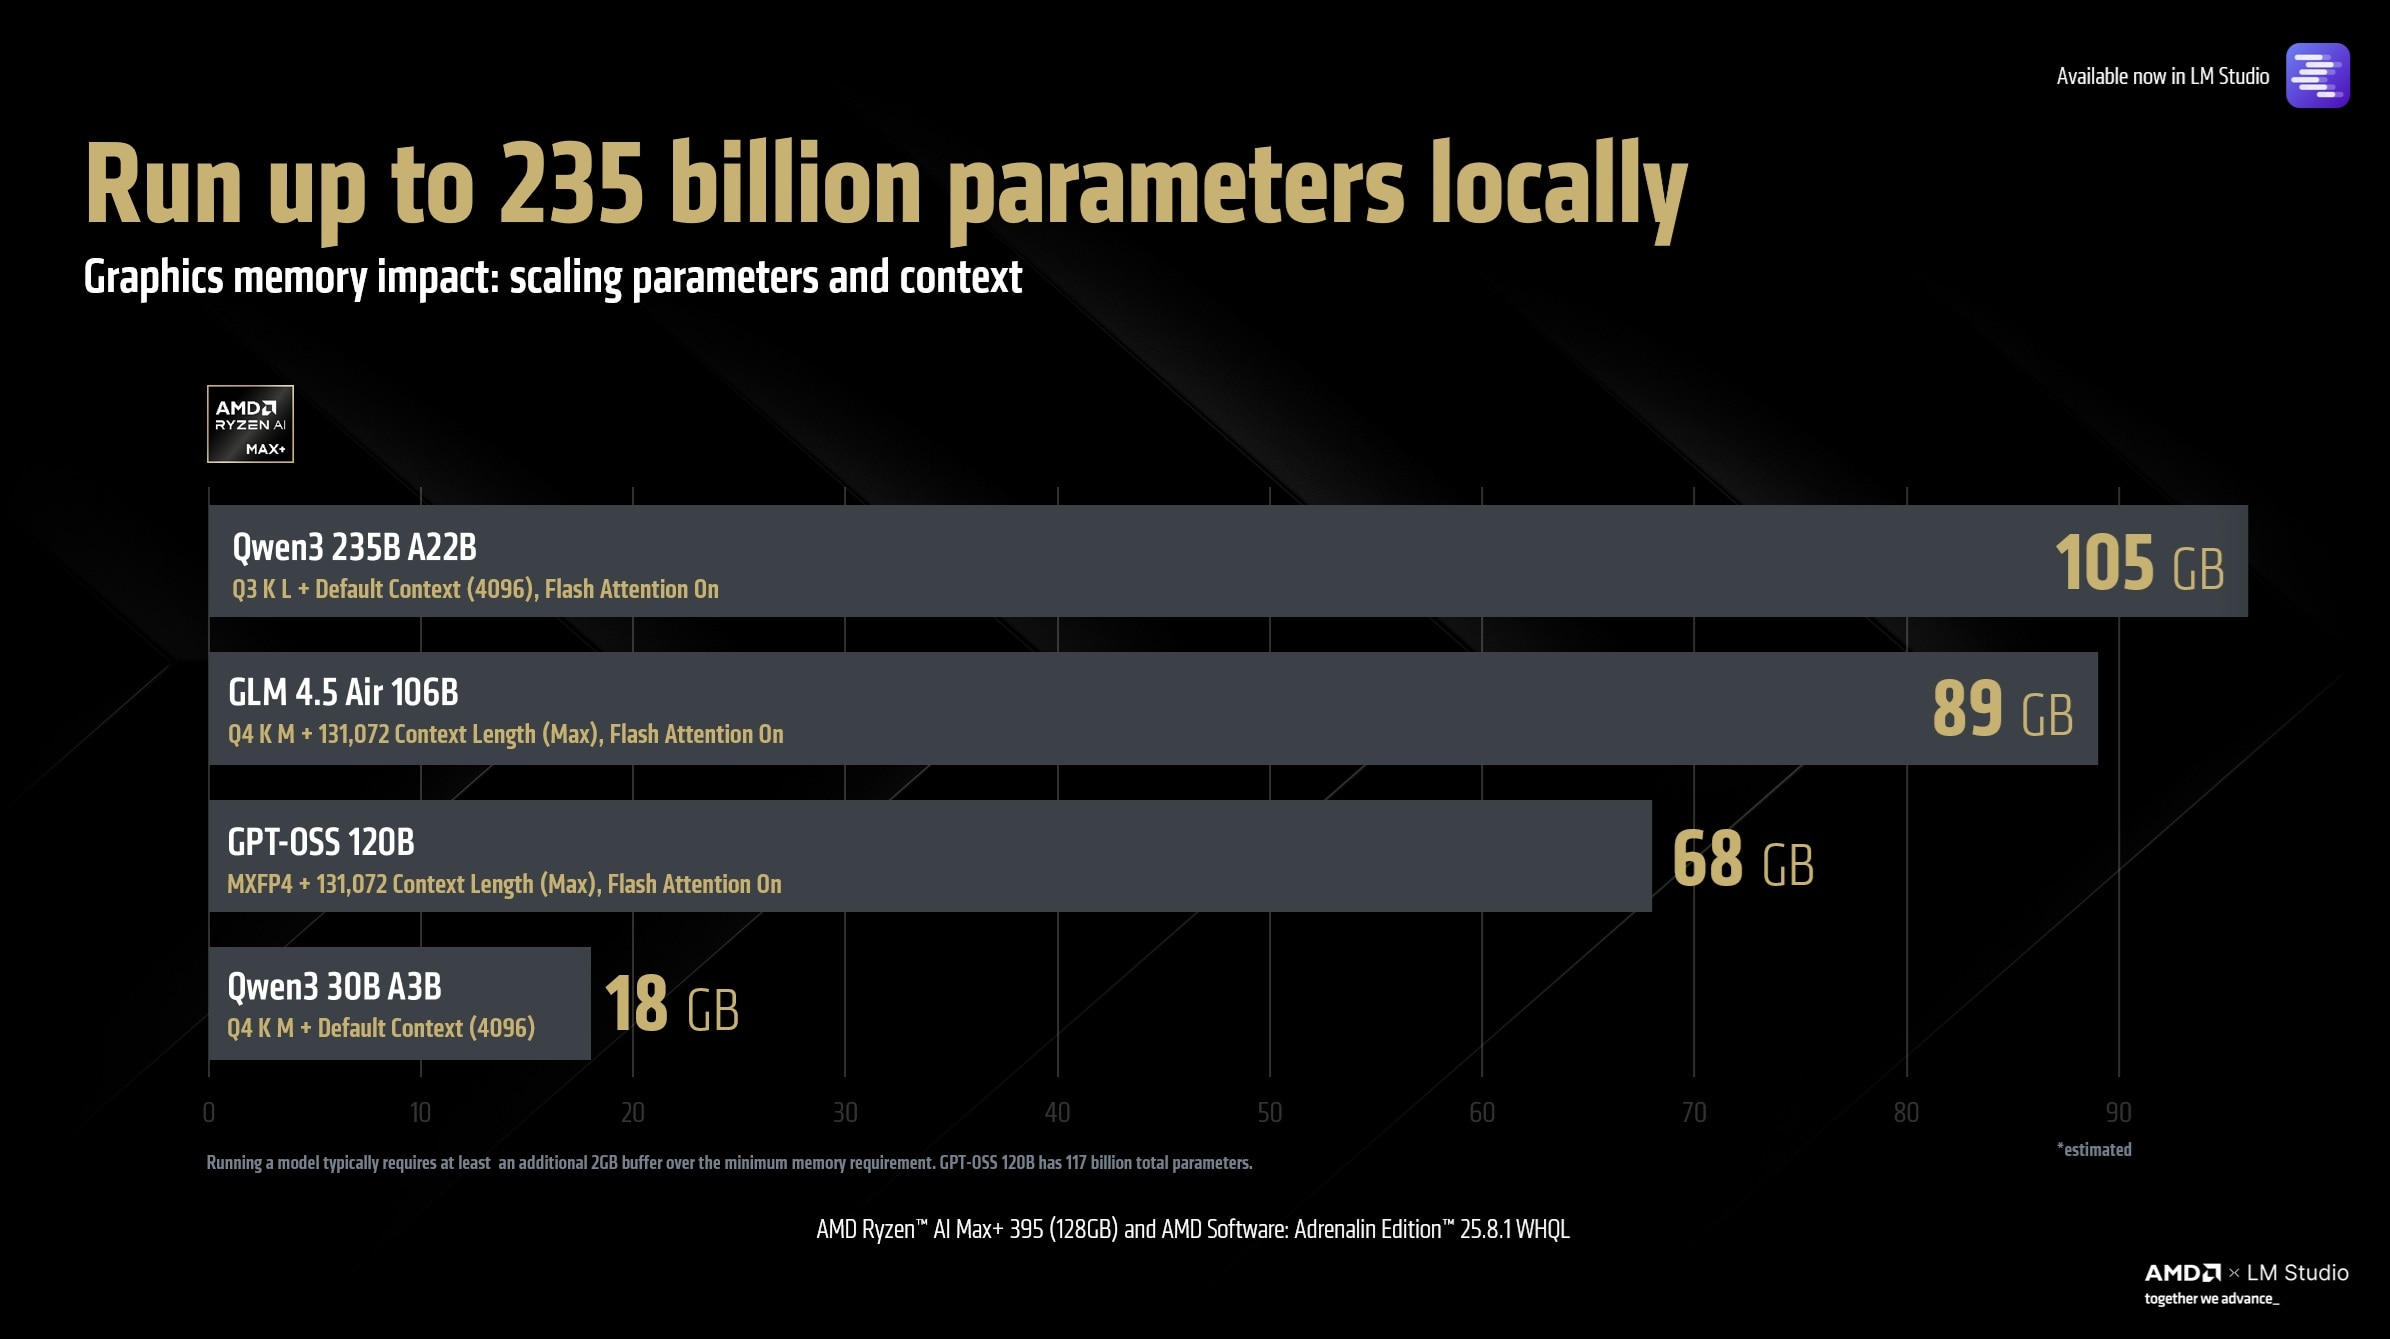
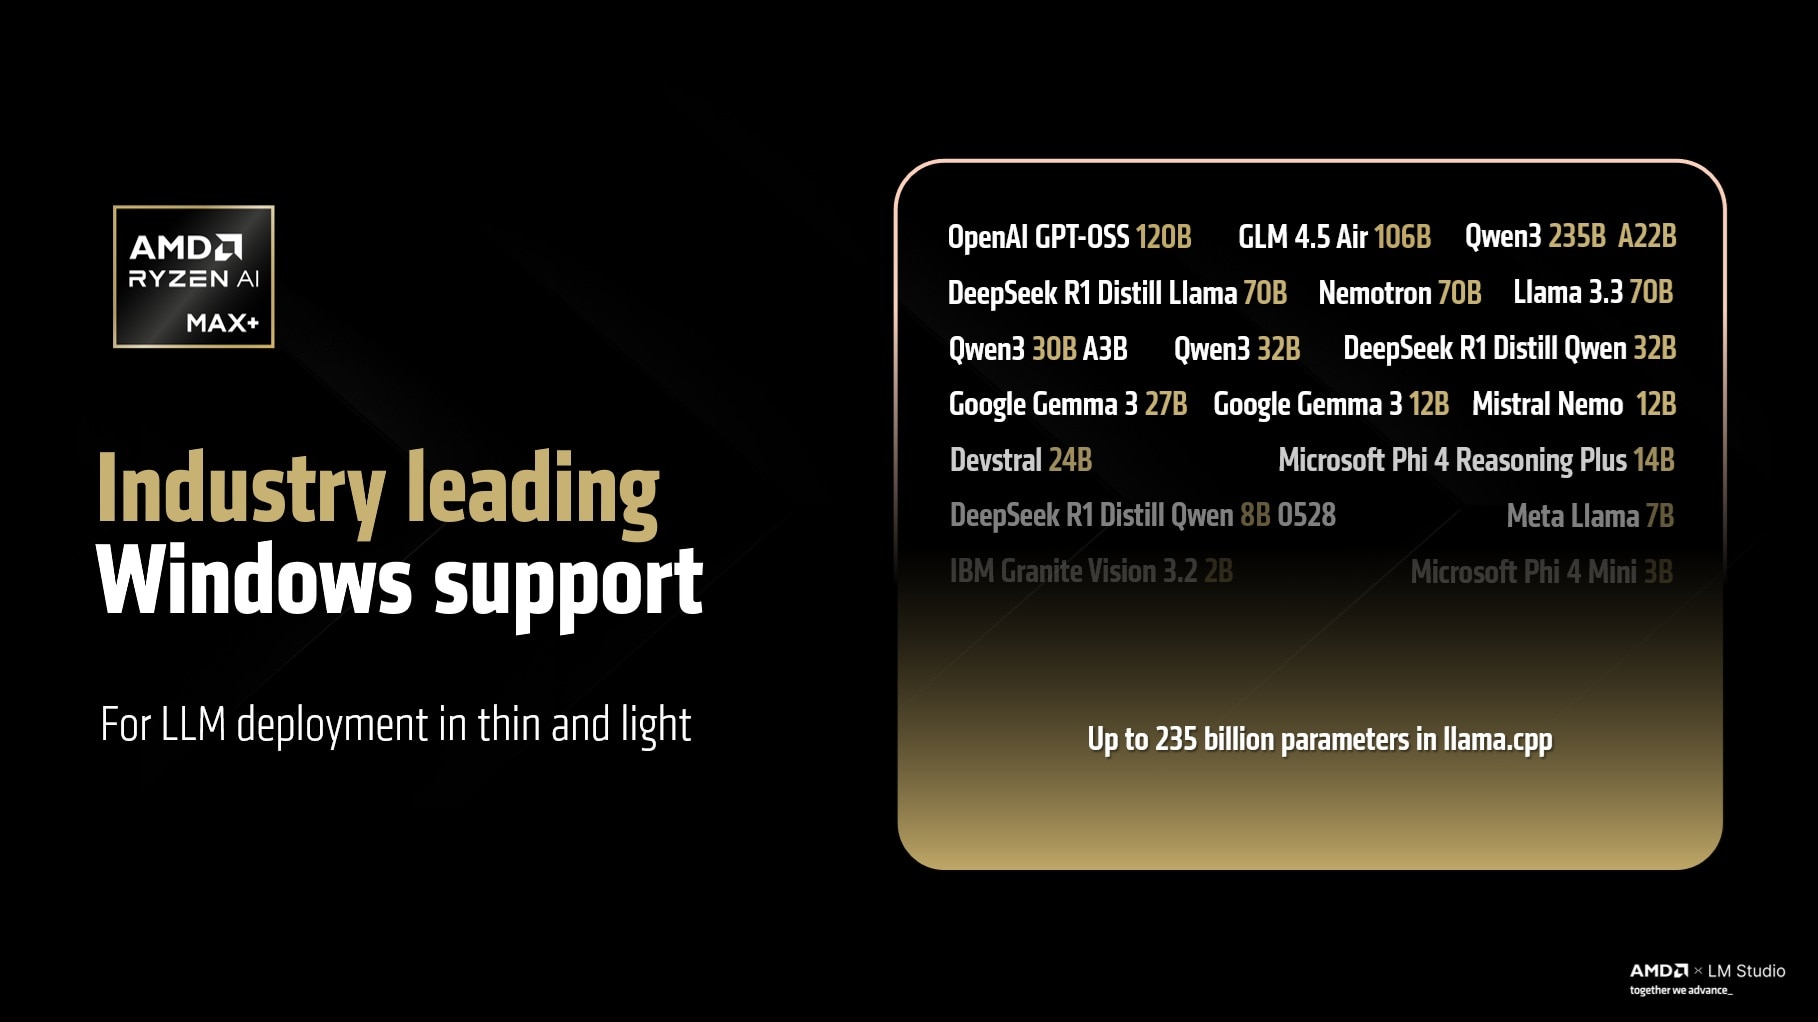
The AMD Ryzen™ AI Max+ processor is the first (and only) Windows AI PC processor capable of running large language models up to 235 Billion parameters in size. This includes support for popular models such as: Open AI's GPT-OSS 120B and Z.ai Org's GLM 4.5 Air. The large unified memory pool also allows models (up to 128 Billion parameters) to run at their maximum context length (which is a memory intensive feature) - enabling and empowering use cases involving tool-calling, MCP and agentic workflows - all available today.

The AMD Ryzen™ AI Max+ platform (codenamed: Strix Halo) allows developers, researchers, creators and AI enthusiasts to deploy and experiment with large scale workloads directly on their systems without relying on the cloud or an internet connection. Carrying a 235 billion parameter model on your fingertips might have been an impossibility a year ago, but with the AMD Ryzen™ AI Max+ (with 128GB memory), it is a reality today.
Quick Start Guide
This quick start guide walks you through the essential steps to get up and running with large AI models locally, helping you tap into the full potential of a AMD Ryzen™ AI Max+ powered system as your personal AI supercomputer.
Unlocking the full capability of your AMD Ryzen™ AI Max+ systems requires the following AMD drivers. Older drivers may not perform as expected or fail to load certain larger models beyond 64GB in size.
Users with AMD Ryzen™ AI Max+ series processors
- Download and install AMD Software: Adrenalin™ Edition 25.8.1 WHQL or higher.
- Right click anywhere on desktop > AMD Software: Adrenalin™ Edition > Performance > Tuning > Variable Graphics Memory > Set to 96GB and Restart
Users with AMD Ryzen™ AI Max+ PRO series processors
Please use this guide for products such as the HP ZBook Ultra G1a or HP Z2 Mini G1a Workstation
- Download and install AMD Software: PRO Edition 25.Q3 or higher.
- Since this is an AMD Ryzen™ AI Max+ Pro product, and due to enterprise security policies, you may need to temporarily pause Windows Updates to ensure the correct AMD driver remains installed.
- Restart to BIOS and set Dedicated Graphics Memory to 96GB.
- After the restart, please right click anywhere on desktop > AMD Software: Pro Edition > verify the driver version shows correctly as 25.Q3 or higher.
Note: Turning on AMD Variable Graphics Memory converts a portion of your system RAM to dedicated graphics memory (VRAM) at the BIOS level and will reduce the memory accessible by the CPU. You can tweak this setting depending on the size of the AI workloads you are running. To learn more about how AMD Variable Graphics Memory works, please click here.

Installing LM Studio
LM Studio, leveraging the open-source llama.cpp framework created by Georgi Gerganov, provides a streamlined and powerful environment for deploying and managing large language models locally. Together with AMD Ryzen™ AI Max+ (with 128GB memory), it enables up to 235 billion parameter models, large context lengths, and tool calls to run on your machine.
For the example below, we will be using OpenAI's GPT-OSS 120B model that runs in the MXFP4 format. According to OpenAI's blog "gpt-oss-120b model achieves near-parity with OpenAI o4-mini on core reasoning benchmarks, while running efficiently on a single 80 GB GPU". The AMD Ryzen™ AI Max+ processor with 96GB of dedicated graphics memory can run GPT-OSS 120B with max context effortlessly:
Note: Loading large models can take a while (several minutes) and the loading bar may seem like it is stuck (this is because the burst speed of typical SSDs falls off after a while and can slow the transfer down).
1. Download LM Studio
- Visit lmstudio.ai and download LM Studio.
2. Skip Onboarding
- After installation, you can skip the onboarding process.
3. Download the Model
- Navigate to the Search tab.
4. Search for “GPT-OSS 120B.”
- On the right-hand side, click Download.
(Note: GPT-OSS 120B uses the MXFP4 format, not Q4_K_M.)
5. Load the Model
- Go to the Chat tab.
- From the central drop-down menu, select GPT-OSS 120B and check “Manually load parameters.”
6. Configure Advanced Settings
- Enable “Show advanced settings.”
- Set GPU Offload Layers to MAX.
- Turn on Flash Attention (important: this must be enabled for large models; high context lengths won’t load without it).
- Set the Context Length to MAX (131,072 for GPT-OSS 120B).
- Check “Remember settings.
7. Start the Model
- Click Load to begin.
- You’re now chatting with a datacenter-class LLM running entirely locally, with maximum context length.
8. For Advanced Users
Developers can enable the LM Studio Server to:
- Allow other applications to access the model, or
- Serve it over your home network—turning your AMD Ryzen™ AI Max+ system into a personal datacenter.
AI Pair Coding (or Vibe Coding) marks the next evolution of software creation where intent, creativity and AI work together to turn ideas into code. With tools like LM Studio, Cline and Microsoft VS Code, users can run advanced autonomous coding agents locally on their AMD Ryzen™ AI Max+ powered system while keeping their data air-gapped (should they chose to), reducing cloud dependency and unlocking true on-device intelligence. Cline also supports advanced MCP (Model Context Protocol) integrations.
Installing Microsoft VS Code and Cline
- Download and install Git for Windows.
- Download and install VS Code for Windows.
- Open LM Studio and Search for "Qwen3 Coder". Select Qwen3 Coder 30B A3B from "Staff Picks" and from the right drop-down menu select "Q8" and download.
- Go to the LM Studio Server tab.
- Turn on the server.
- While staying on the server tab, select Qwen3 Coder 30B from the drop down menu but select "manually load parameters".
- Check "show advanced settings" and turn on Flash Attention. Set context length to 128,000.
- Make sure GPU offload layers are set to MAX.
- Check "remember settings" and click load.
- Minimize LM Studio.
- Go the Cline Website and click on Install Cine for VS Code.
- In the LLM providers, select “LM Studio”.
- In VS Code, click on the cline icon on the right hand side and click on settings (wheel nut) and under Plan Mode and Act Mode (API configuration) make sure it is set to the model you downloaded in LM Studio such as Qwen3 Coder.
- Without exiting the Cline settings context menu, now click on “terminal settings” (on the left side) – which is a command line icon. Change the “Default Terminal Profile” dropdown to “Git Bash”
- Click Done to close the Cline settings and save them. Start a new “Plan” task using the sample prompt given below and once you have a response from the Cline.bot. Shift the toggle to “Act” Mode for it to start working!
Example: An Autonomous AI Agent Builds a Physically-accurate N-Body Simulation with just a Prompt

For advanced developers looking for Pytorch on Windows, nightly builds of AMD ROCm™ Software are available today. These builds are experimental and AMD is committed to delivering continuous feature and performance improvements.
1. Open Powershell as Admin.
- Press Start → type “PowerShell” → right-click → “Run as Administrator.”
2. Search for available Python versions:
winget search Python
3. Install the correct Python version (3.12) with long-path enabled:
winget install Python.Python.3.12 --override "PrependPath=1 Include_test=0 Include_launcher=1 InstallAllUsers=1 EnableLongPath=1"
4. Create a Python Virtual Environment
python -m venv pytorch-venv
5. Activate the Python Virtual environment:
Note: you may have to change your powershell execution policy to execute scripts.
pytorch-venv\Scripts\activate
6. Install the latest ROCm nightly build using pip:
		python -m pip install `
  --pre `
  --index-url https://rocm.nightlies.amd.com/v2/gfx1151/ `
  torch torchaudio torchvision
7. Test the Pytorch installation:
		import torch
print(torch.cuda.is_available())
# True
print(torch.cuda.get_device_name(0))
# e.g. AMD Radeon Pro W7900 Dual Slot
Optional: Install ComfyUI
Note: This is an early preview build and AMD is working on improving this experience for users. The current build may exhibit stability or performance variations under certain workloads. Ongoing enhancements in both areas are expected over the coming weeks and months. We recommend users pair this ComfyUI preview with the AMD Software: Pytorch Preview Driver for the best experience at this stage.
8. Install Git x64 for Windows
9. Download ComfyUI using Git:
git clone https://github.com/comfyanonymous/ComfyUI.git
10. CD to the ComfyUI directory
11. Install requirements.txt using pip:
pip install -r requirements.txt
12. Launch ComfyUI
python main.py
13. Open the host URL to interact with ComfyUI
Join the AMD Developer Discord channel for support.
AMD Ryzen™ Max+ redefines what is possible at the intersection of AI and personal computing. By combining datacenter-class AI with the proven versatility of the x86 architecture and the familiarity of the Windows ecosystem, it empowers users to explore massive models and intelligent agents without giving up the tools and workflows they rely on every day. As a leader in high-performance computing and AI innovation, AMD continues to bridge the gap between cloud-scale capability and personal productivity - enabling a future where every desktop can be a true personal AI supercomputer.
Links to third party sites are provided for convenience and unless explicitly stated, AMD is not responsible for the contents of such linked sites and no endorsement is implied. GD-97.


