OpenClaw (Clawd Bot) with vLLM Running for Free on AMD Developer Cloud
Feb 02, 2026
Over the past week, OpenClaw (previously known as Clawd Bot and Molt Bot) has seen a surge of activity. Users are highlighting impressive projects and demonstrating how they use the agent as a personal assistant. However, there has also been ongoing discussion regarding cost and security.
To address these concerns, this guide demonstrates how to use a powerful open-source model that exceeds the limits of typical consumer-grade GPUs by running it on enterprise data center hardware, specifically the AMD Instinct™ MI300X with a massive 192GB of memory, at no cost.
Complimentary AMD Developer Cloud Credits via AMD AI Developer Program
The AMD AI Developer Program provides members with $100 in free credits, which is enough for approximately 50 hours of usage to get started. Members who showcase useful applications and publicly share their projects may also apply for additional credits.
Beyond the credits, signing up grants you a one-month DeepLearning.AI Premium membership, automatic entry into monthly AMD hardware sweepstakes, and access to free AMD training courses.
Getting Started
Step 1: Sign up for the AMD AI Developer Program
- Existing Users: If you already have an AMD account, simply sign in and enroll in the program.
- New Users: Select “Create an account” on the login page to set up your AMD account and enroll simultaneously.
Step 2: Activate Your Credits
After you join the program, navigate to the “member-site” to find your free credit activation code.

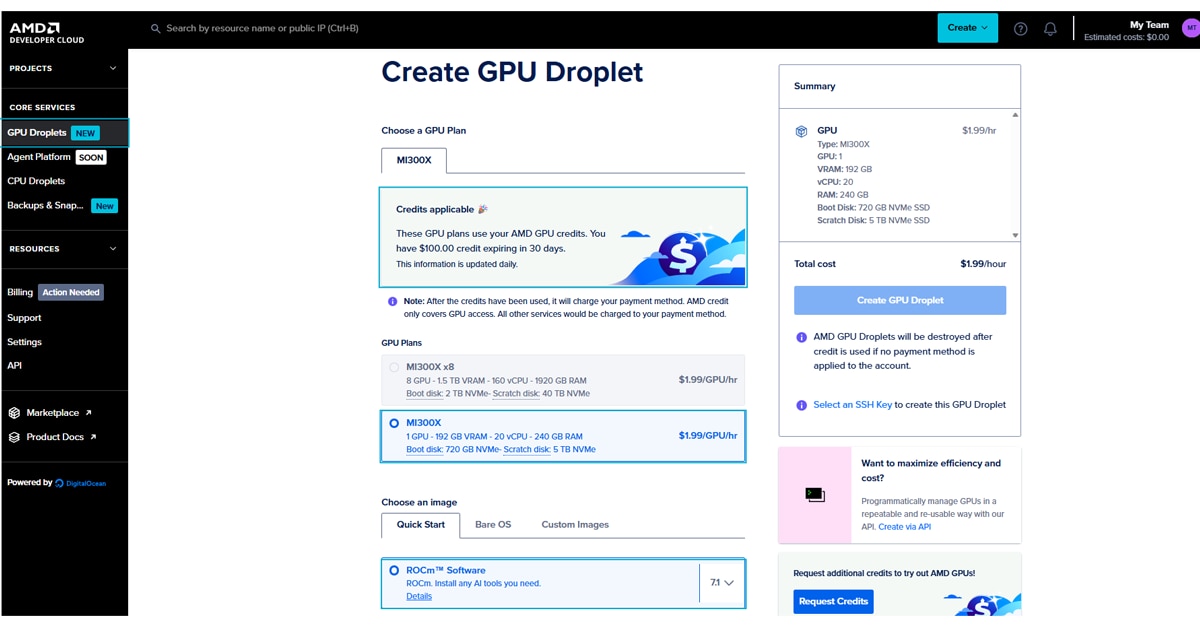
Step 3: Create a GPU Droplet
Once signed in, you will be directed to the Create a GPU Droplet page, where your credits should appear at the top.
- Select Hardware: Choose a single MI300X instance.
- Select Image: Choose the ROCm Software image.
- Configure Access: Add your SSH key (instructions for creating one are provided in that section of the page).
Image Zoom
Once the droplet is created, you can access it via your terminal or by clicking on Web Console button:
ssh root@<YOUR_DROPLET_IP>
Running the Model with vLLM
We will use vLLM, one of the most popular frameworks for LLMs, to run our model. The following steps must be followed in your droplet that you created in the previous step.
Step 1: Environment Setup
In this example, we will use pip in a virtual environment. Run the following commands on your droplet to set up the environment:
		apt install python3.12-venv
python3 -m venv .venv
source .venv/bin/activate
Next, install the ROCm-optimized version of vLLM:
pip install vllm==0.15.0+rocm700 --extra-index-url https://wheels.vllm.ai/rocm/0.15.0/rocm700
Step 2: Configure Firewall and Launch vLLM
In this step, we demonstrate how you can run a suitable model from HuggingFace with vLLM.
First, open port 8090 to allow traffic to your model:
ufw allow 8090
Next, run the command below to pull a pruned version of MiniMax-M2.1 model from HuggingFace. This model is 139B parameters in FP8, meaning it fits comfortably within the MI300X 192GB of memory.
Note: Replace abc-123 in the command below with a secure, unique API Key.
		VLLM_USE_TRITON_FLASH_ATTN=0 vllm serve cerebras/MiniMax-M2.1-REAP-139B-A10B \
    --served-model-name MiniMax-M2.1 \
    --api-key abc-123 \
    --port 8090 \
    --enable-auto-tool-choice \
    --tool-call-parser minimax_m2 \
    --trust-remote-code \
    --reasoning-parser minimax_m2_append_think \
    --max-model-len 194000 \
    --gpu-memory-utilization 0.99
This command downloads the model weights, loads them onto your GPU, and creates an OpenAI-compatible endpoint accessible at: http://<your-droplet-ip>:8090/v1
Connecting OpenClaw to Your Local LLM
Now that the model is running, we will configure OpenClaw to use it.
Step 1: Install OpenClaw
If you haven't installed OpenClaw yet, use the following command (for Mac/Linux):
curl -fsSL https://openclaw.ai/install.sh | bash
During installation, when asked “How do you want to hatch your bot?”, select “Open the Web UI” and follow the instructions to open the web app.
Step 2: Configure the Provider
In the OpenClaw Web UI, navigate to Settings > Config. We need to add our local LLM information.
- Name:
vllm - API: Select
openai-completions - API Key: Enter the key you defined earlier (e.g., abc-123)
- Base URL:
http://<your-droplet-ip>:8090/v1
Image Zoom
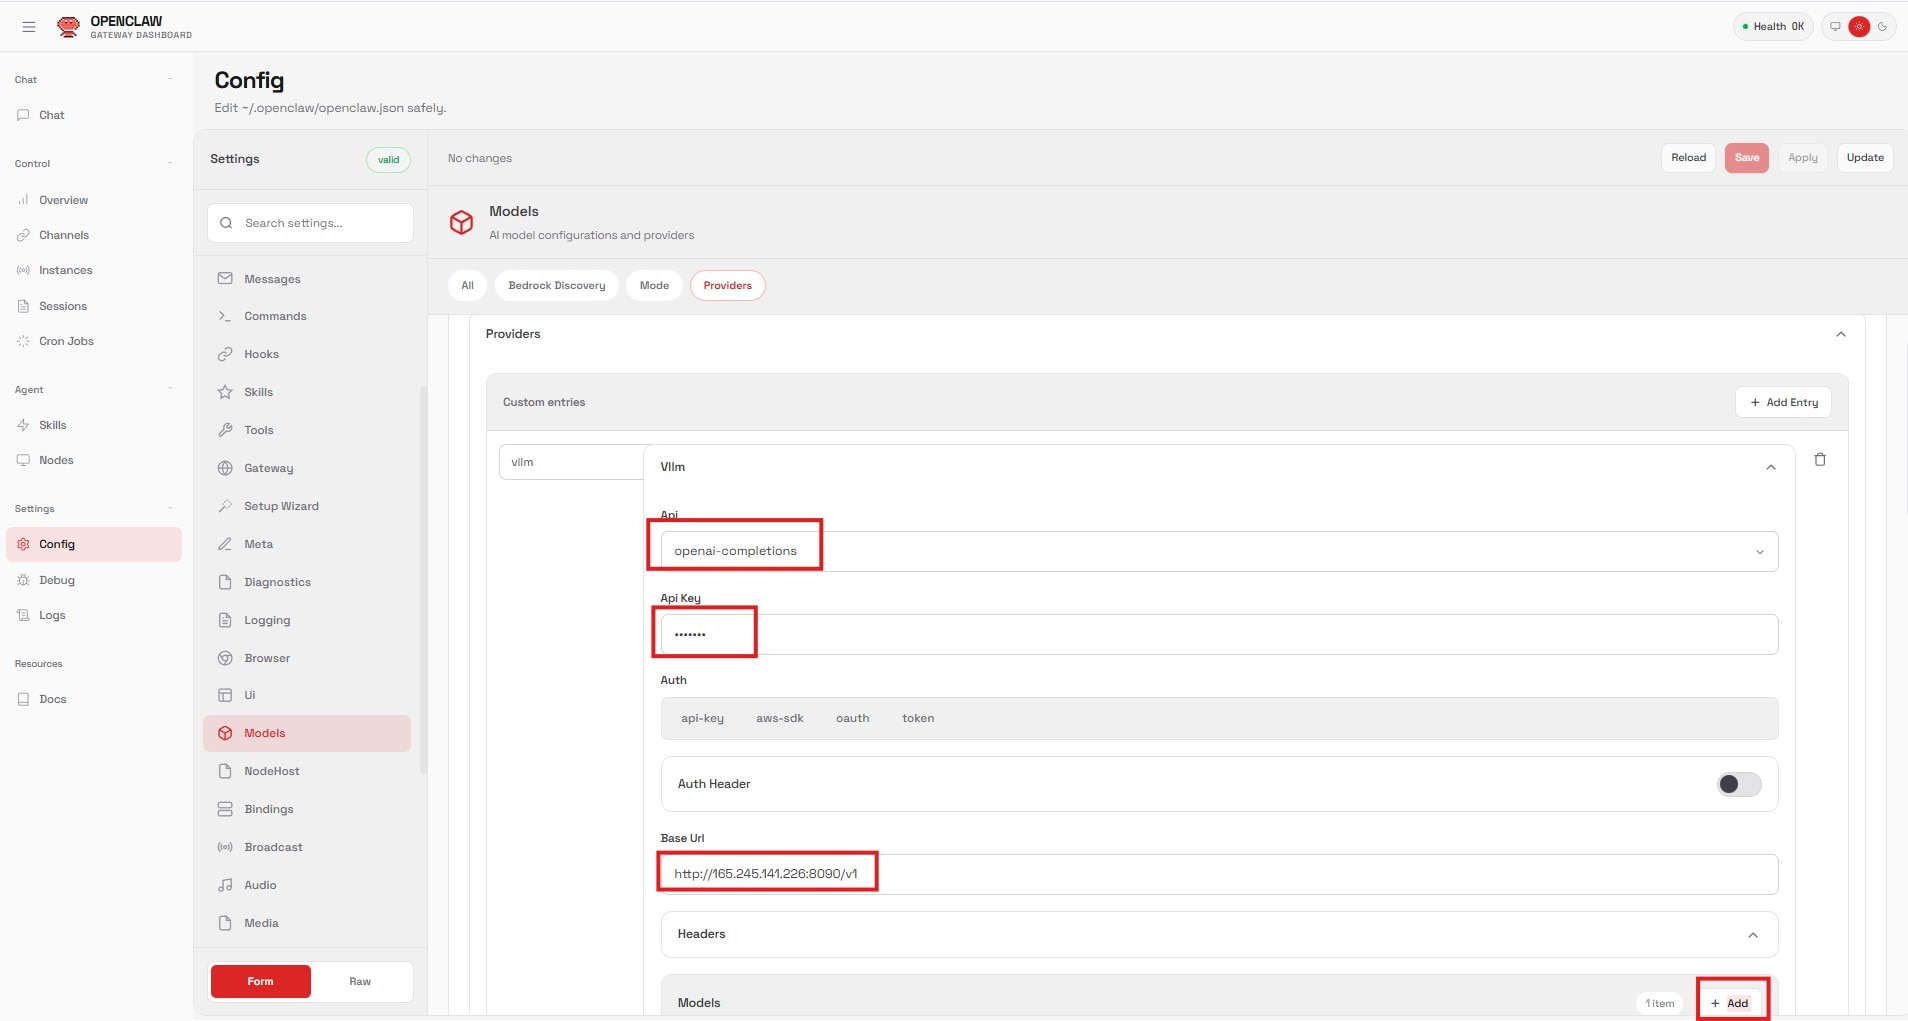
Image Zoom
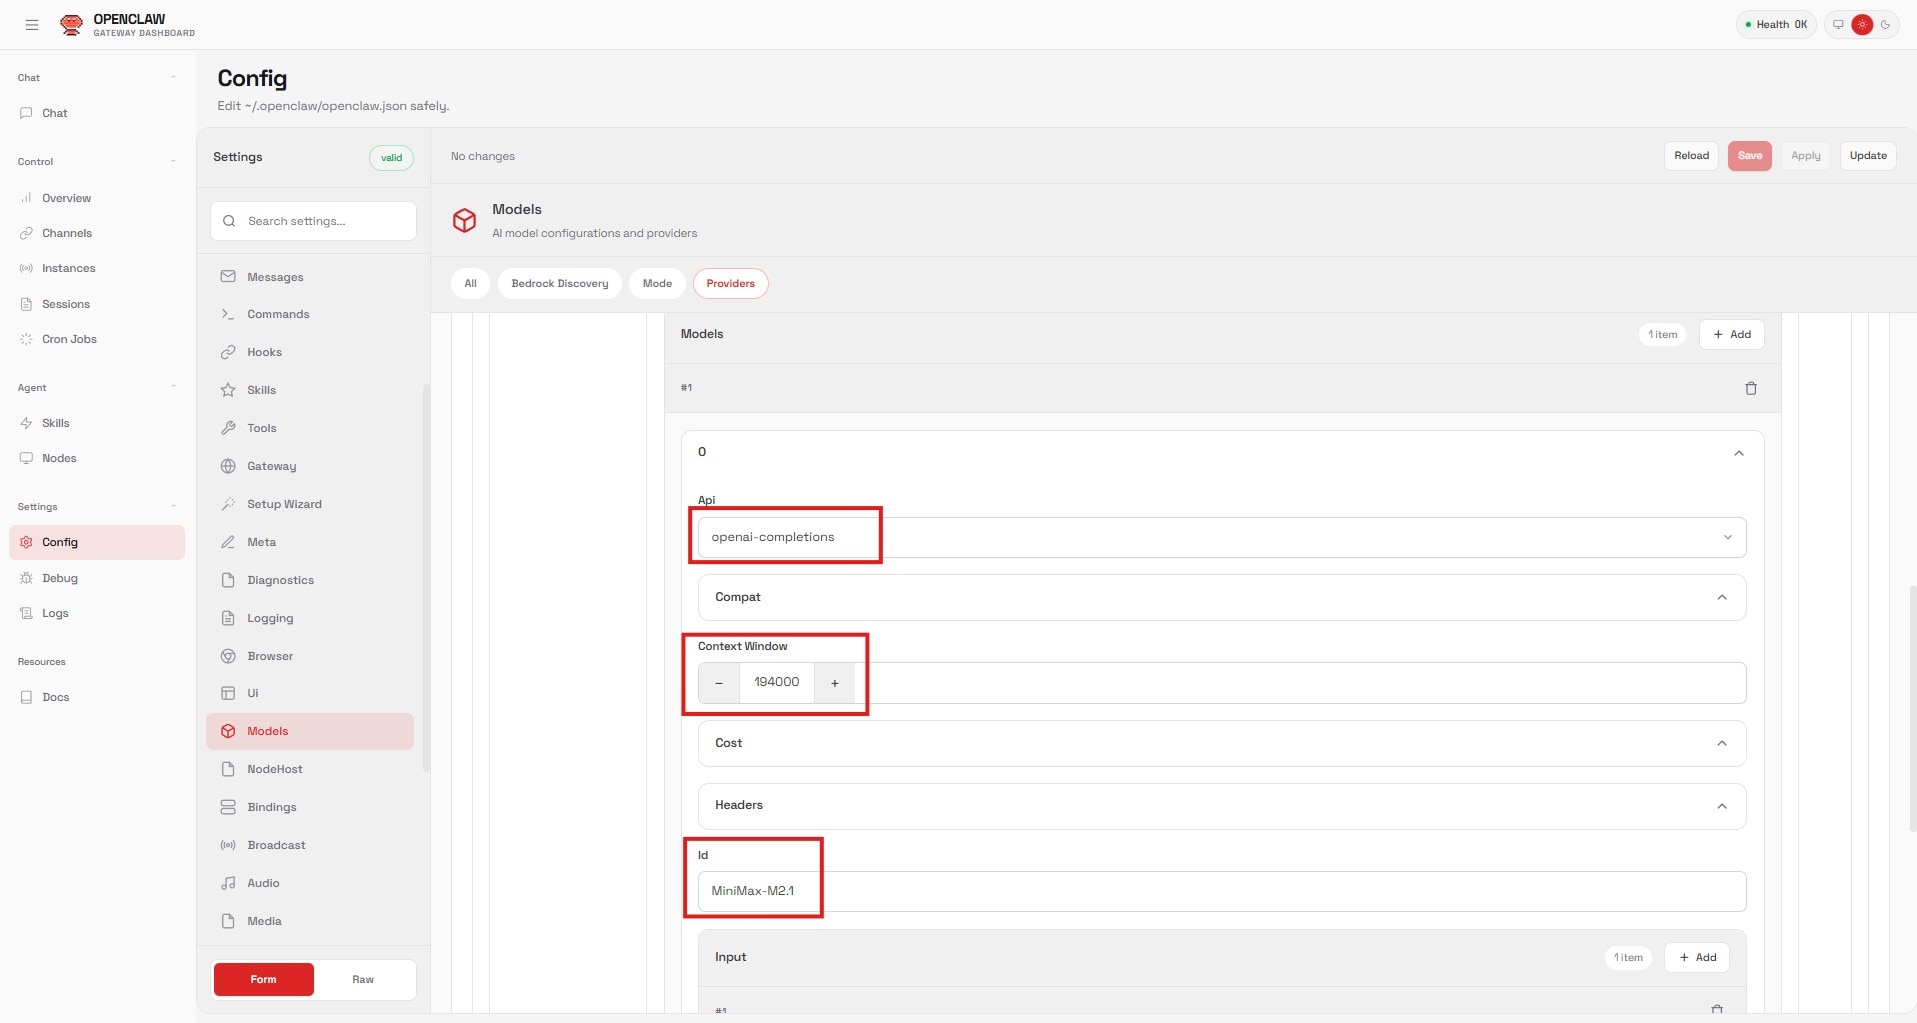
Image Zoom
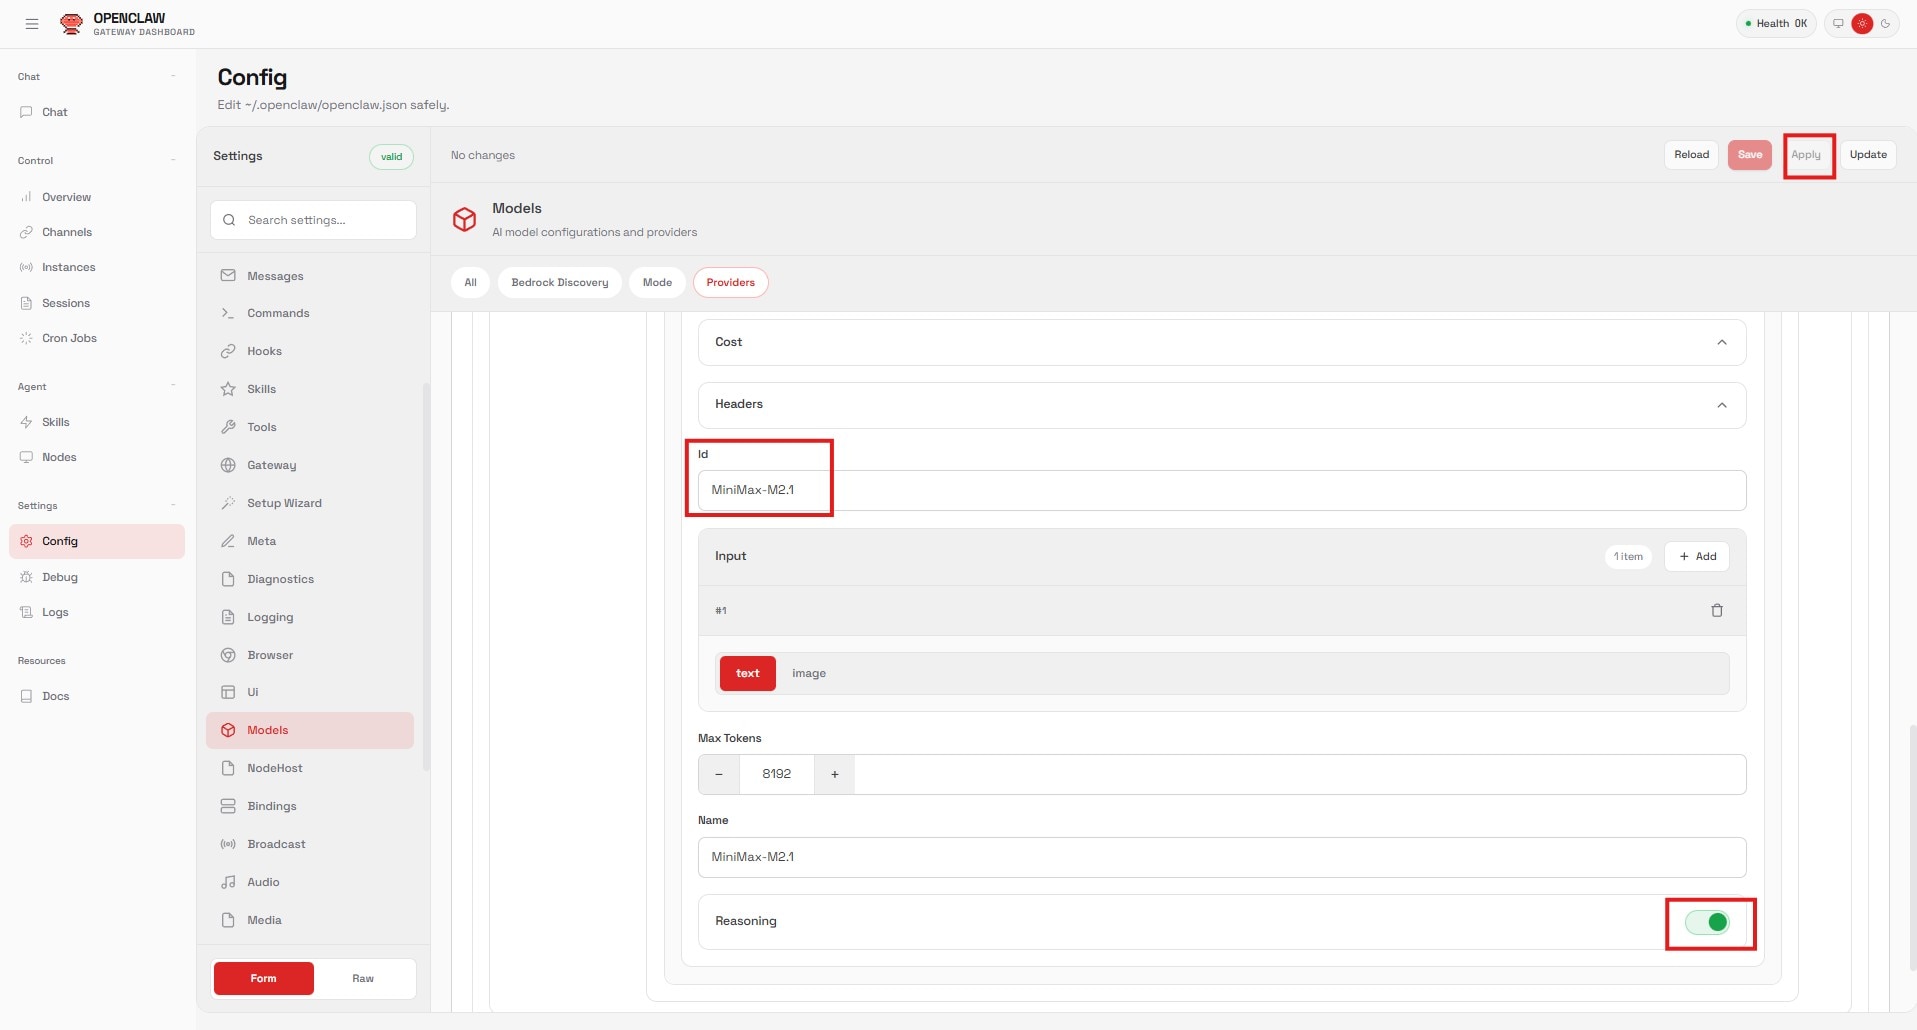
Step 3: Configure the Model
- Add a new entry under “Models”:
- API: Select
openai-completions. - Context Window: Set to
194000(matching themax-model-lensetting). - ID: Set to
MiniMax-M2.1(matching theserved-model-name).
- API: Select
- Click Apply.
Step 4: Set the Agent
Finally, connect this model to your main agent:
- Navigate to the Agents section.
- Change the Primary Model value to:
vllm/MiniMax-M2.1(this is based on the values we entered under for Models configuration). - Click Apply.
Image Zoom

Conclusion
You are now ready to start chatting with your agent running on enterprise-grade hardware. You can use this same method to run other open-source models from Hugging Face. Don't forget to share your projects with the community to earn more free GPU credits. Happy building - the world is your Lobster!


Related Blogs
-
ROCm 7.14: TheRock Goes Production and Expands AMD’s AI Software Platform — ROCm Blogs
Explore what's new in ROCm 7.14: TheRock goes production, expanded hardware support, stronger AI frameworks, and enhanced profiling tools.
July 14, 2026
-
What to Expect at AMD Advancing AI 2026
Get a preview of AMD Advancing AI 2026, including key themes, sessions, and innovations shaping the future of AI. Discover how industry leaders are coming together to explore real-world use cases and strategies for scaling AI across the enterprise.
July 14, 2026
-
LogsLop: A Tiny Summarization Tool for Enormous Log Files — ROCm Blogs
LogsLop deduplicates repetitive log lines so humans and LLMs can find failures in enormous log files.
July 13, 2026
-
Announcing the ROCm Certification Program
Build AI and HPC expertise on AMD Instinctt™ GPUs. Earn the ROCmt™ Certification with hands-on, production-ready skills.
July 13, 2026
-
Serving NVFP4 Models on AMD Instinct™ MI355 Accelerators — ROCm Blogs
Learn how to serve NVFP4 models on AMD Instinct™ MI355 using an emulation pipeline in vLLM — no format conversion needed.
July 12, 2026
-
Towards Feature Complete Triton Support in JAX-Triton — ROCm Blogs
Learn what new features were added to JAX-Triton and how that could help you write or reuse more efficient and readable GPU kernels in JAX.
July 07, 2026
-
RDC and RocProfiler Compared to DCGM for Commonly Used Metrics — ROCm Blogs
Learn how CLI commands and Python code help you evaluate app performance without a profiler, with examples explaining what each metric means.
July 06, 2026
-
AMD Ryzen™ AI Developer Platform: Open, Ready, and Built for AI
Meet the AMD Ryzen™ AI Developer Platform: open, AI-first, and ready to help developers build, test, and deploy AI workloads.
July 06, 2026