Deploying Hermes Agent for Free on AMD Developer Cloud with open models and vLLM
May 21, 2026

The AI agent landscape is evolving fast. Coding copilots and chatbot wrappers have their place, but a new class of agent is emerging – one that doesn't just follow instructions but learns from experience.
Hermes Agent built by Nous Research, represents a shift in how we interact with AI. What makes it unique is that it is the first self-improving AI entity designed to grow alongside its users. For an autonomous agent, skills are the critical instructions that dictate its behavior. In Hermes, these skills are not just static tools; instead, they are created from experience and refined during use.
In essence, the power of Hermes lies in its ability to transform past actions into procedural knowledge, making it more capable and personalized the longer it runs.
This blog focuses on a practical path to deployment: running Hermes Agent for free using open-source models (e.g Qwen3.5) and vLLM on the AMD Developer Cloud . By leveraging a single AMD Instinct™ MI300X GPU, developers can experience a high-performance, self-improving agent stack on world-class AMD hardware. It’s a straightforward setup for those looking to explore how Hermes builds its own skills and procedural knowledge without the need for a large upfront investment.
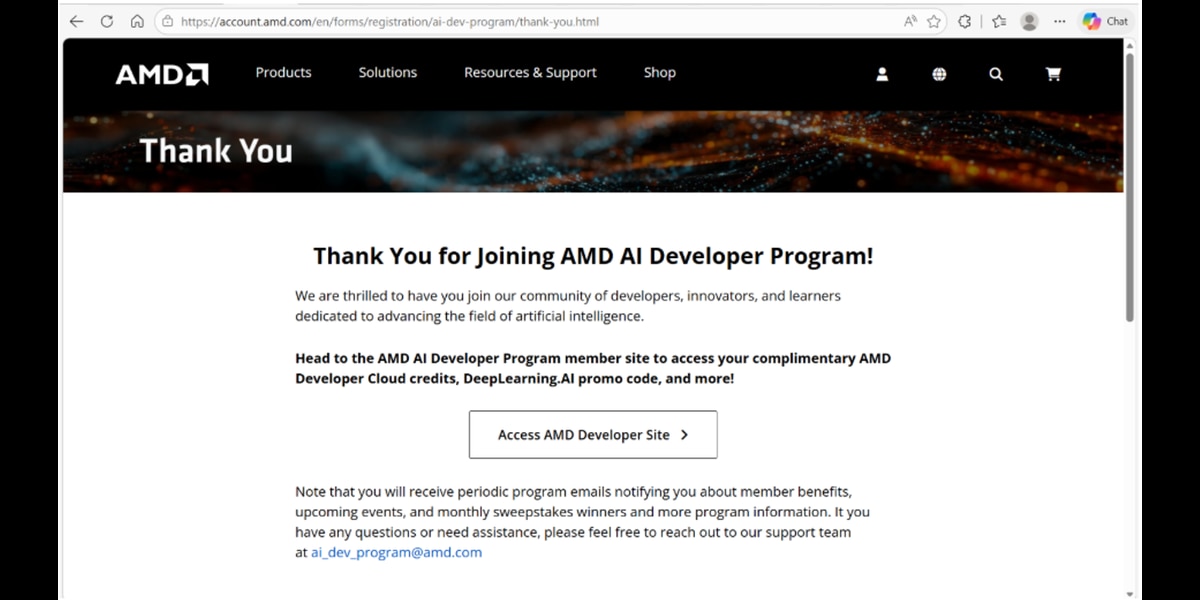
Unlocking AMD Developer Cloud Credits through the AMD AI Developer Program
To facilitate experimentation, the AMD AI Developer Program offers members $100 in free AMD Developer Cloud credits – providing roughly 50 hours of compute time to jumpstart your development. For those who share their projects and showcase innovative applications, there is also an opportunity to apply for additional credits.
Beyond the cloud resources, membership includes:
- A one-month DeepLearning.AI Pro subscription.
- Access to specialized AMD training courses.
- Automatic entry into monthly hardware sweepstakes.
Getting Started
Step 1: Sign up for the AMD AI Developer Program
- For Existing Users: Sign in to your AMD account and follow the prompts to enroll in the program.
- For New Users: Select “Create an account” on the login page to set up your profile and enroll in the developer program simultaneously.
Step 2: Activating Your Credits
Once your enrollment is complete, head over to AMD AI Developer Portal.
- Navigate to the 'Member Perks' section
- Claim Credits: Select ‘Request Cloud Credits’ and follow the on-screen instructions to link the $100 credit to your account
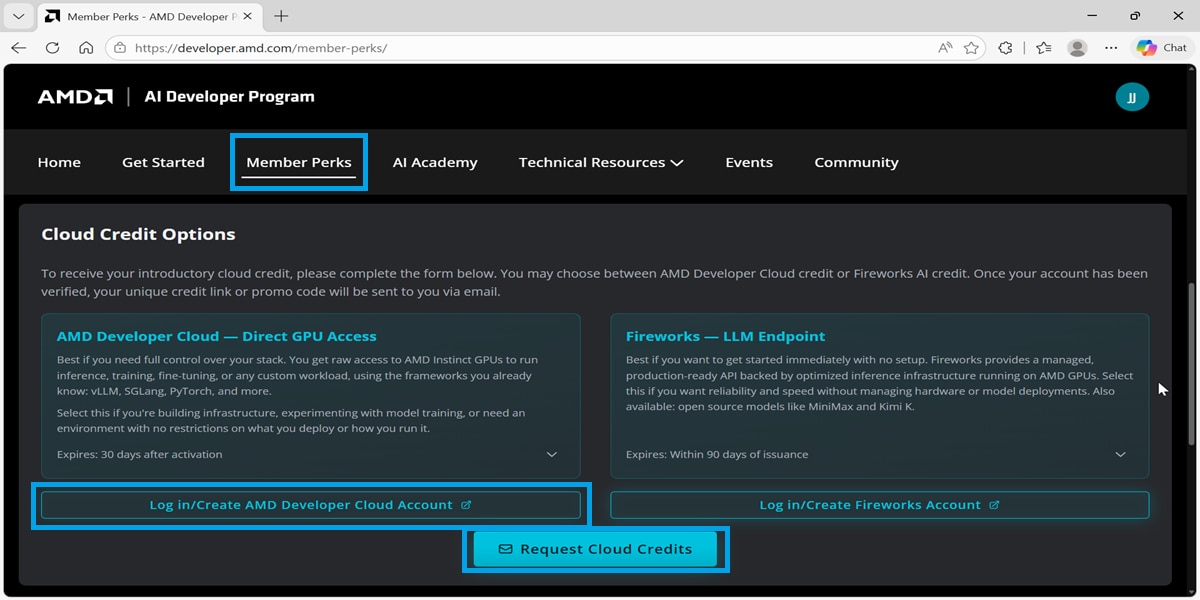
3. Enter the cloud: Click on ‘Log in/Create AMD Developer Cloud Account’. This will redirect you to the AMD Developer Cloud dashboard, where you can begin Step 3.
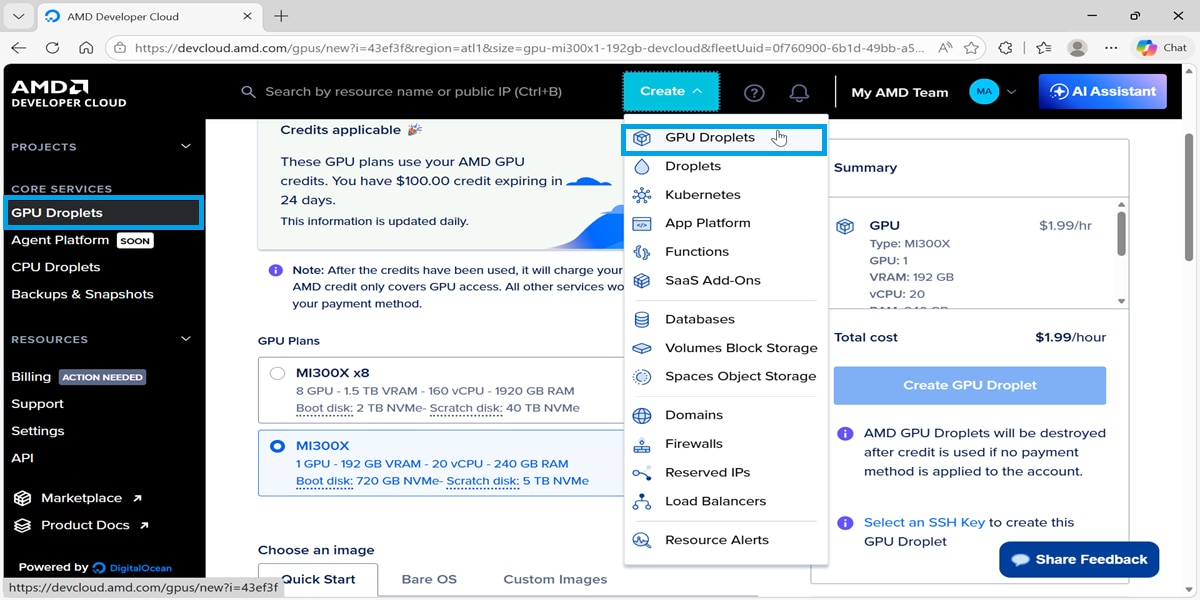
Step 3: Deploying Your GPU Instance
After activation, navigate to the Create a GPU Droplet page. You should see your credit balance reflected at the top of the interface.
- Select Hardware: Choose the single MI300X instance to leverage its high-capacity HBM3 memory.
- Select Image: Choose the official ROCm™ Software image to ensure full compatibility with vLLM.
- Configure Access: Add your SSH key for secure connectivity (if you don’t have one, the portal provides a quick guide on generating a key pair).
Once the droplet is created, you can access it via the Web Console or through your terminal:
ssh root@<YOUR_DROPLET_IP>
Running the Model with vLLM
To power our Hermes Agent, we will use vLLM, a high-throughput and memory-efficient inference engine. vLLM is particularly effective on the MI300X GPUs, as it leverages PagedAttention to maximize the utility of the GPU’s massive HBM3 memory.
Follow these steps within the GPU instance you created in the previous section.
Step 1: Configure the Firewall
First, we need to open port 8001 to allow the agent to communicate with the model server
sudo ufw allow 8001
Step 2: Launch the Model via vLLM Docker Container
To serve the model, we use the official vLLM ROCm image, which is specifically built to bridge the OpenAI-compatible API with the ROCm software stack.
First, pull the stable version of the container:
docker pull vllm/vllm-openai-rocm:latest
Next, run the following command to launch the Qwen3.5 model. This command configures the model to utilize 90% of the MI300X GPU’s VRAM and enables specialized parsers for agentic tool-calling:
		sudo docker run -d --ipc=host --network=host --privileged \
  --device=/dev/kfd --device=/dev/dri --name hermes_service \
  -v $HOME/.hermes/workspace:/workspace \
  --entrypoint /bin/bash vllm/vllm-openai-rocm:latest \
  -c "python3 -m vllm.entrypoints.openai.api_server \
  --model Qwen/Qwen3.5-35B-A3B \
  --port 8001 \
  --trust-remote-code \
  --gpu-memory-utilization 0.9 \
  --max-model-len 65536 \
  --tensor-parallel-size 1 \
  --enable-auto-tool-choice \
  --tool-call-parser qwen3_coder \
  --reasoning-parser qwen3 \
  --host 0.0.0.0"
Note:
- ‘--gpu-memory-utilization 0.9’: This ensures the model has enough room on the MI300X to handle long context window.
- ‘--tool-call-parser': This is critical for Hermes, as it ensures the agent can accurately “understand” when the model wants to use a tool.
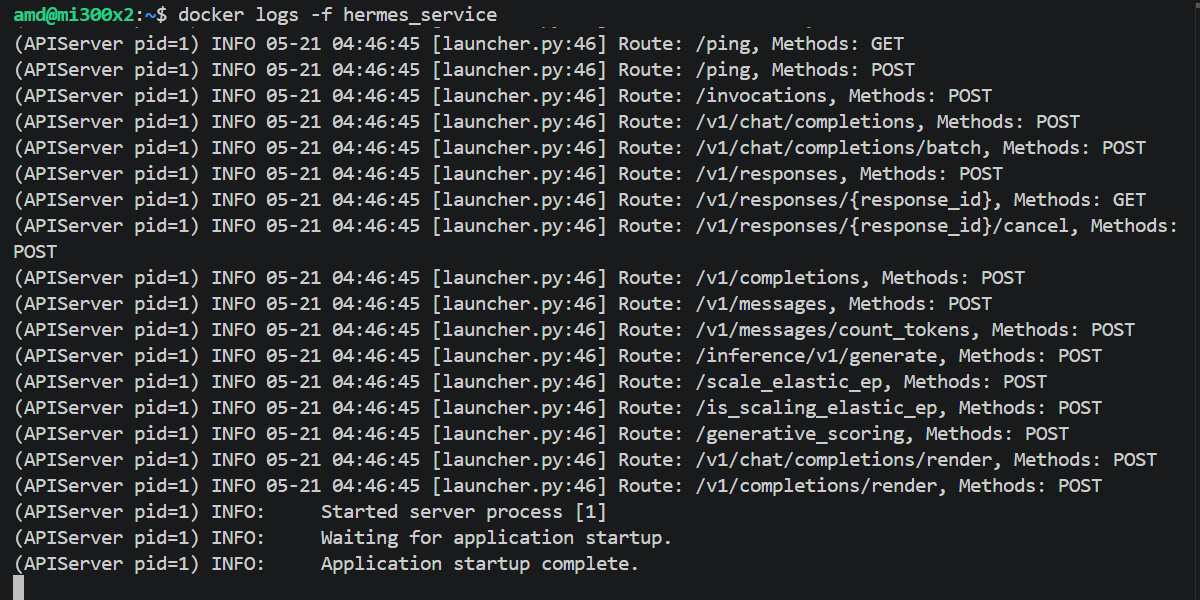
Loading a 35B parameter model onto the GPU takes a moment. You can monitor the progress and ensure the engine starts correctly by tailing the container logs:
sudo docker logs -f hermes_service
Look for the line: `INFO: Application startup complete` before proceeding to the next step.
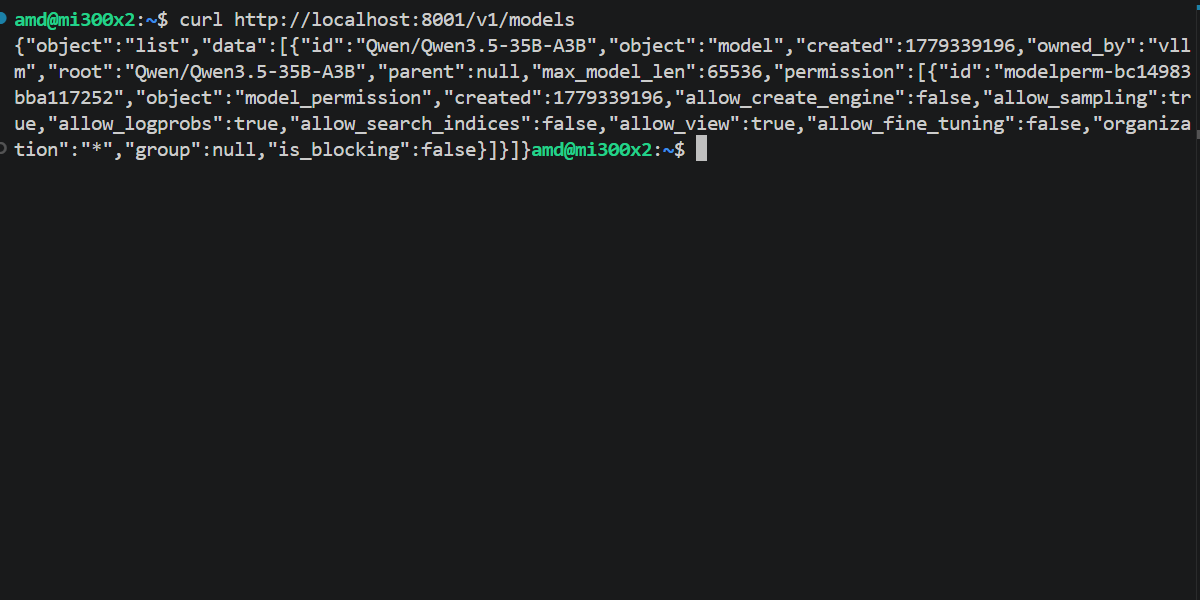
Step 3: Verify the Connection
Run this command from your local terminal to see a list of models currently being served by your vLLM instance.
curl http://<your-droplet-ip>:8001/v1/models
You can expect the out of the command to look like this:
Connecting Hermes Agent to Your Local LLM
With your model successfully serving on the MI300X GPU, the final step is to install the Hermes Agent and point it to your new endpoint.
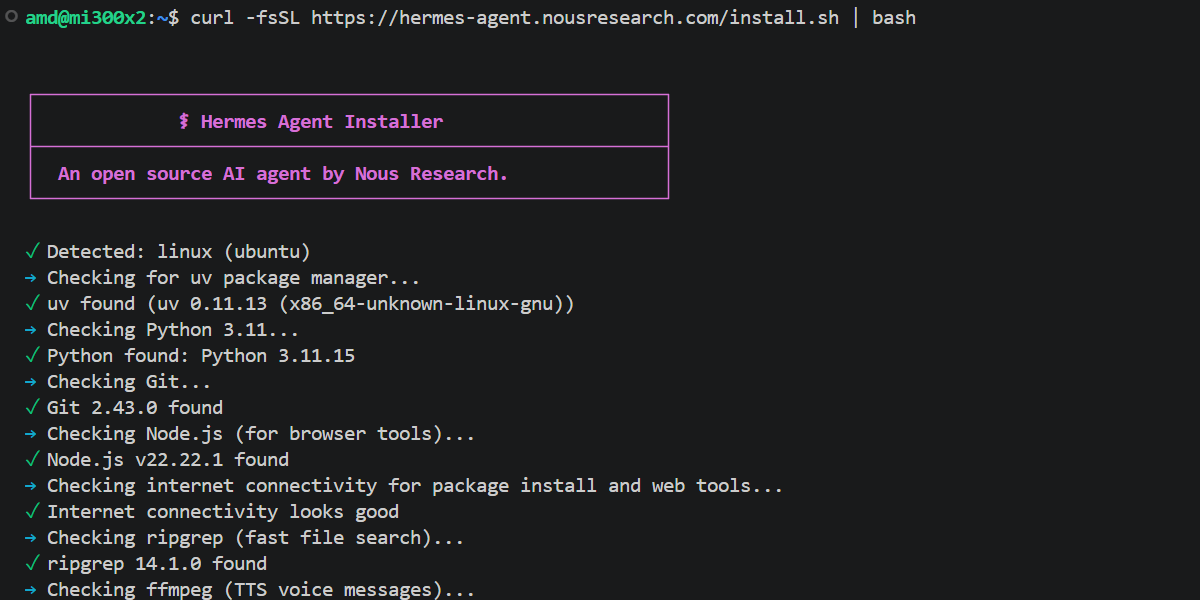
Step 1: Install Hermes Agent
Run the official one-line installer on your local machine or directly on your droplet (supports Linux, macOS, or WSL2):
curl -fsSL https://hermes-agent.nousresearch.com/install.sh | bash
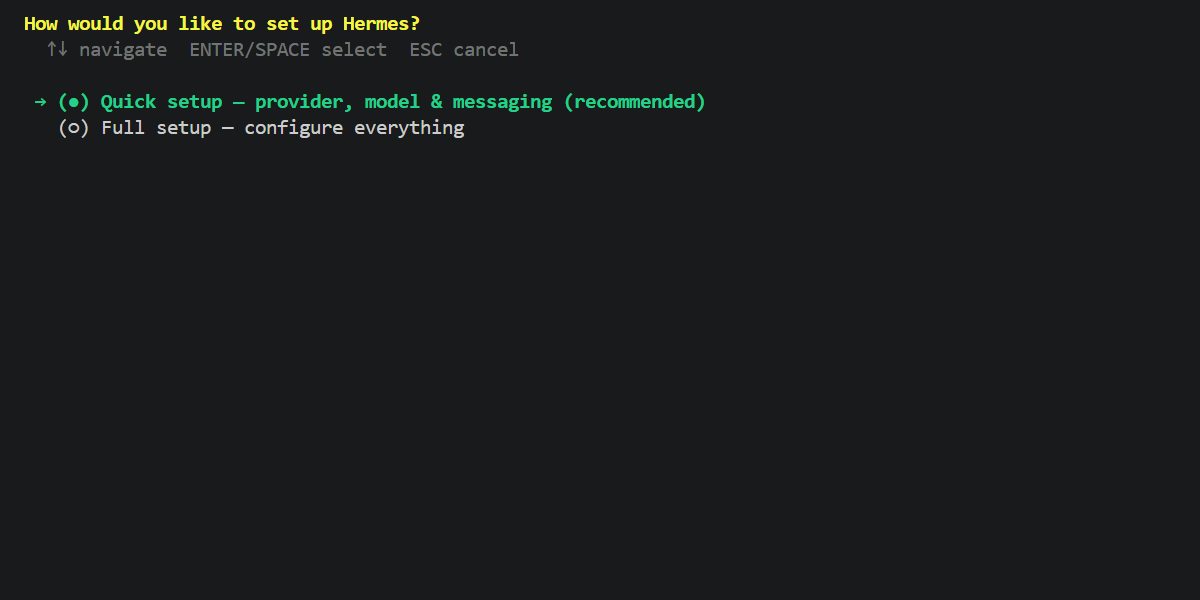
Step 2: Initialize the Setup Wizard
Select “Quick setup”: For a minimal working setup, follow the prompts. Keep all settings at their default values except for the Provider and Model sections detailed in Step 3 and Step 4
Step 3: Point Hermes to your MI300X
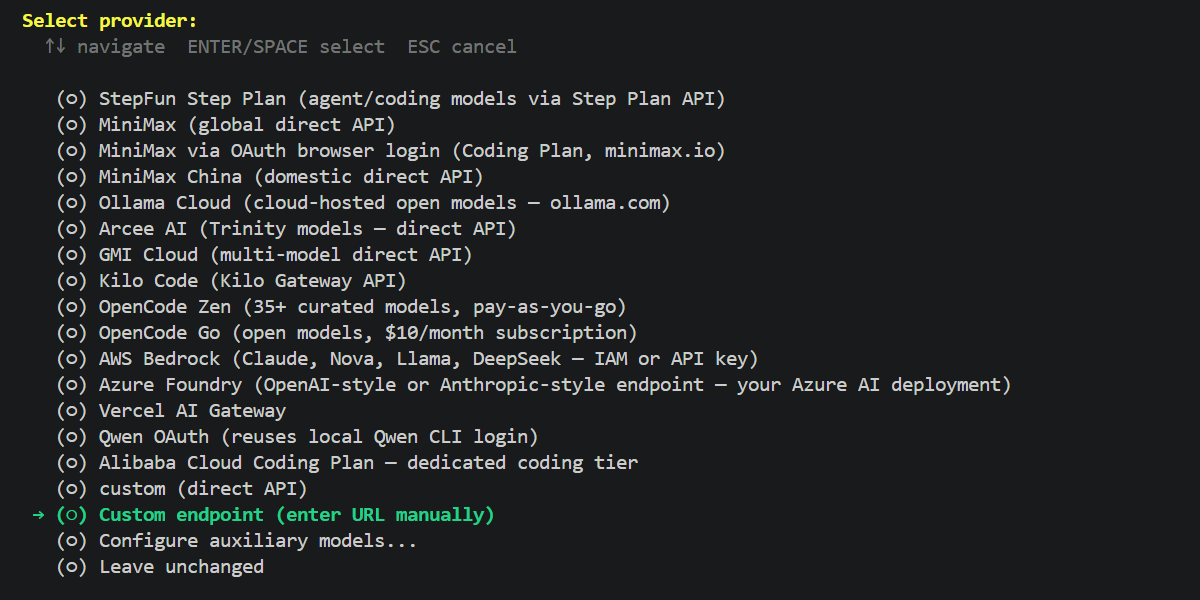
During the Quick setup, when the wizard asks for your provider:
- Choose ‘Custom endpoint (enter URL manually)’
- Base URL: Use the endpoint we verified earlier:
http://<your-droplet-ip>:8001/v1
3. Model Name: Enter ‘Qwen/Qwen3.5-35B-A3B'
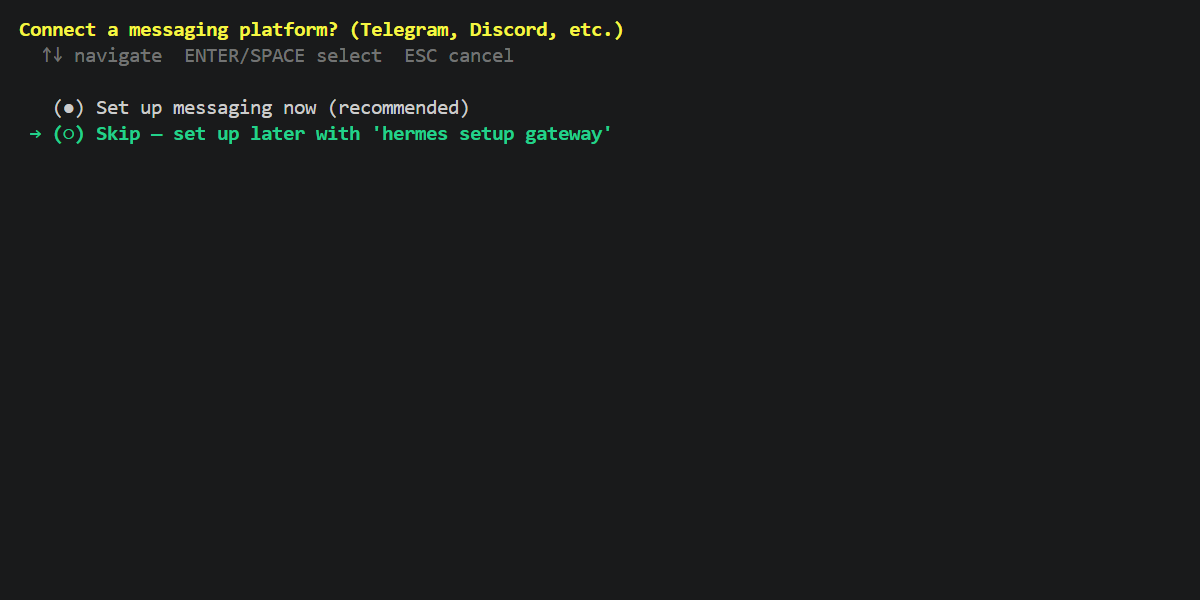
Step 4: Skip connecting messaging platform
For now, skip connecting to messaging platforms
Step 5: Launching the Hermes TUI (Terminal User Interface)
Run the following command in your terminal to start the agent
hermes
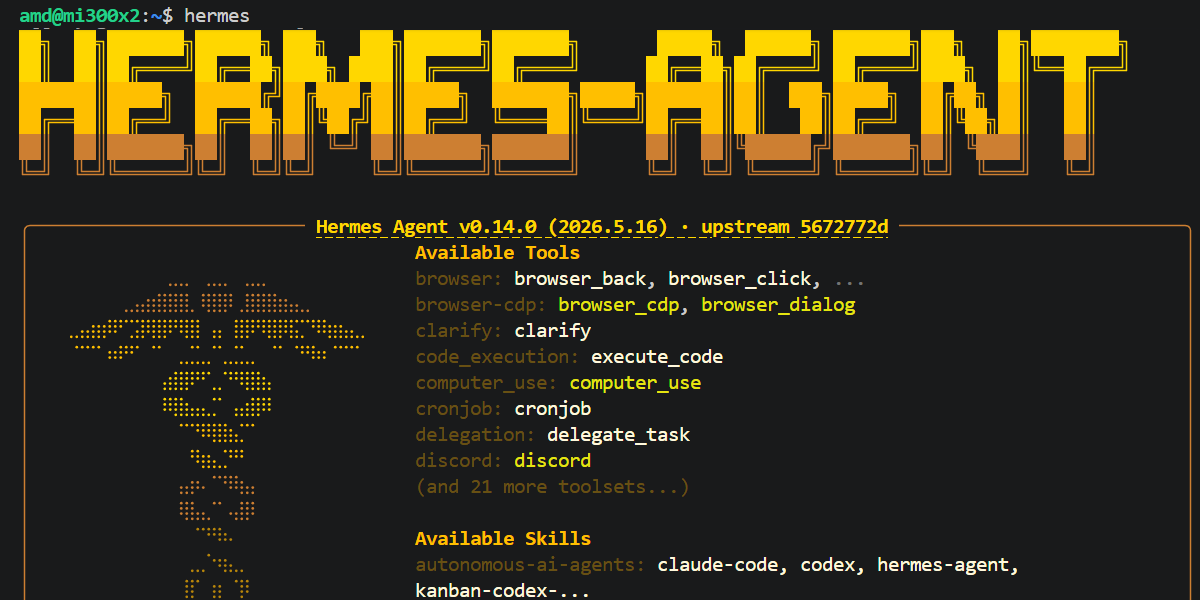
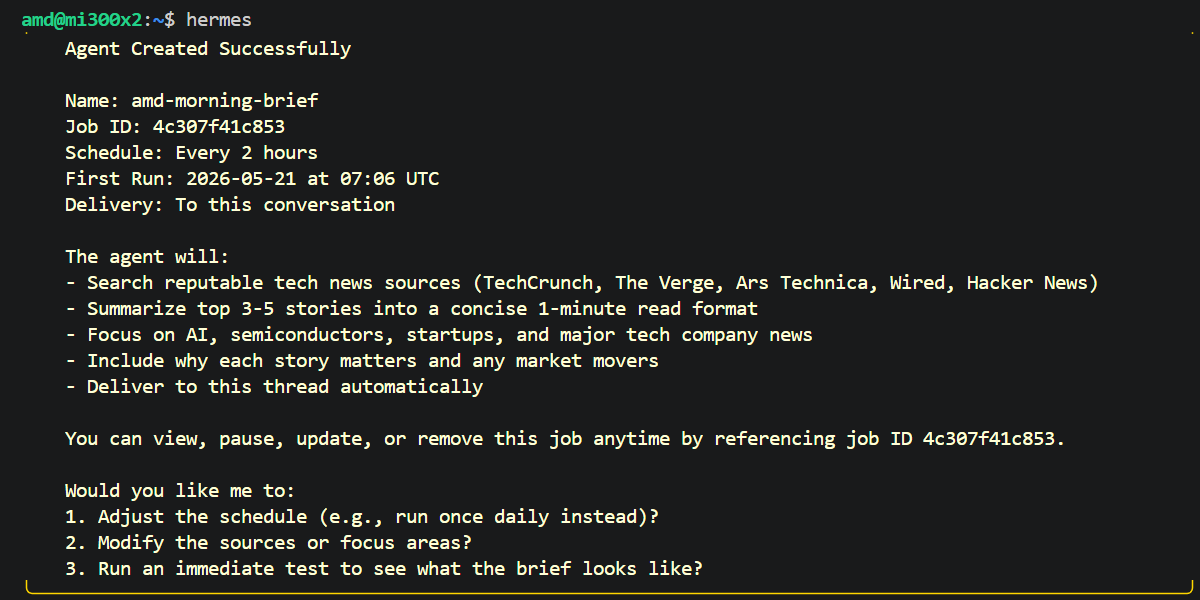
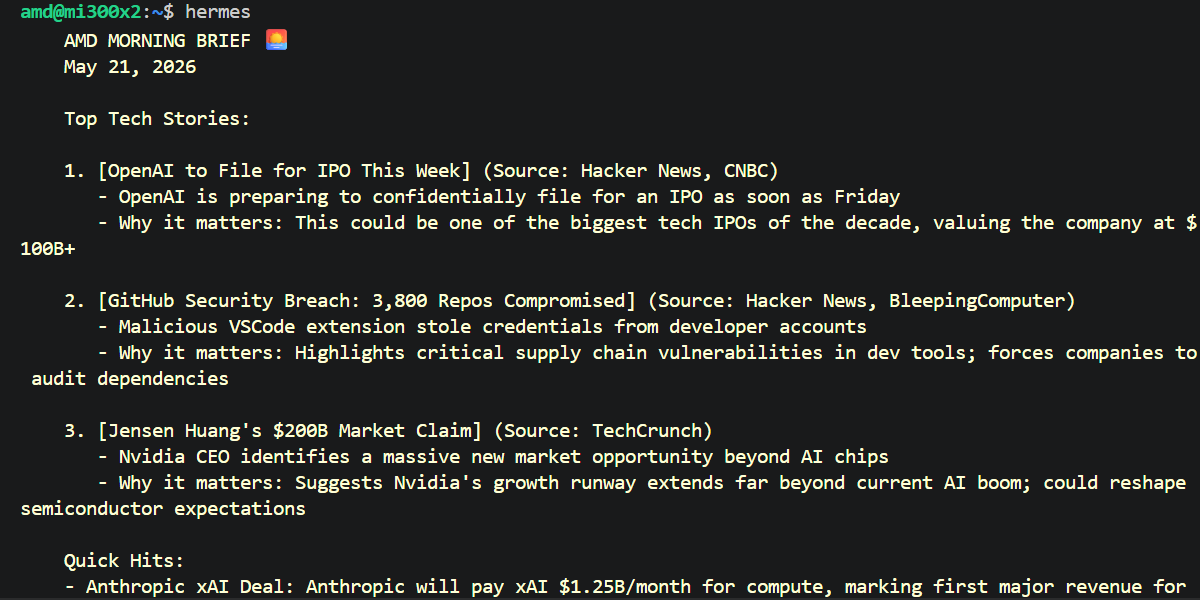
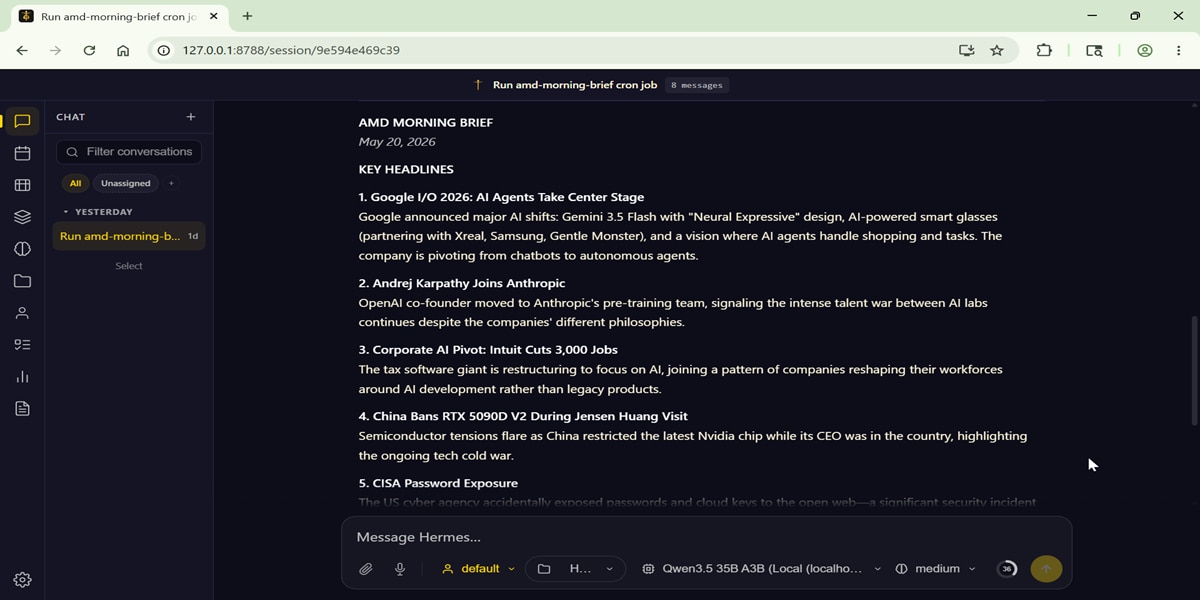
With the setup complete, your Hermes Agent is now active and powered by the Qwen3.5 model running on your local MI300X. You can now begin interacting with your agent across your configured platforms and watch as it starts building its first set of autonomous skills from your very first conversation, e.g:
Create an agent called amd-morning-brief. Task: Summarize the latest tech news. Optimize for a 1-mintue read. Use your search tools to find reputable news sources.
Step 6: Hermes Monitoring/Configuration (Web Pane)
While the TUI is excellent for interaction, Hermes provides a dedicated Web Management Pane for more granular control. To launch it, run:
hermes dashboard
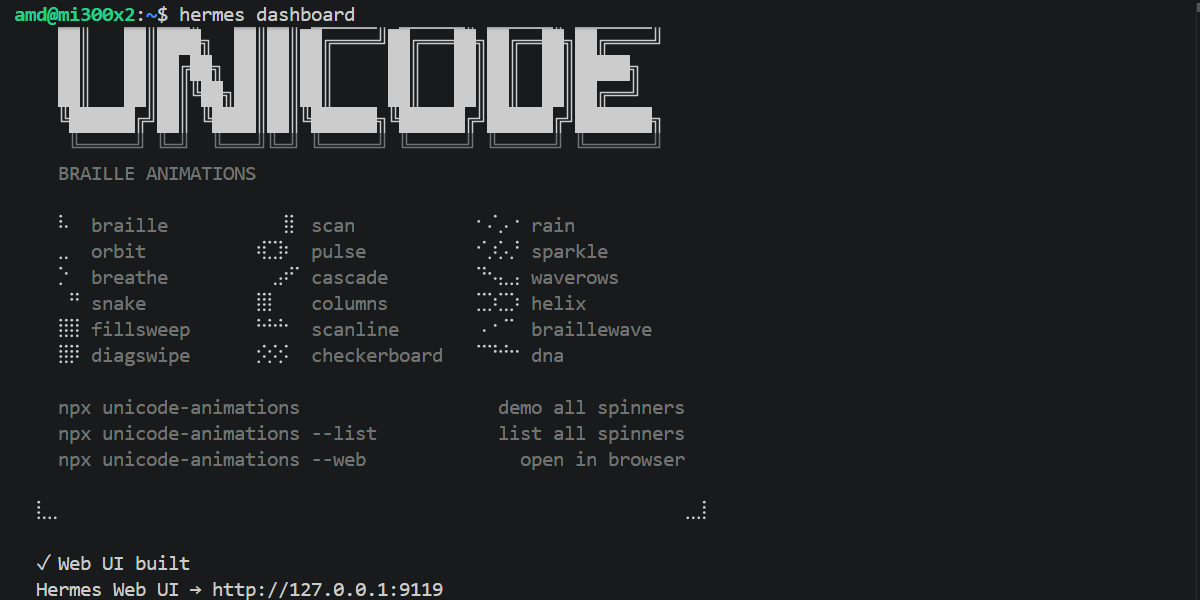
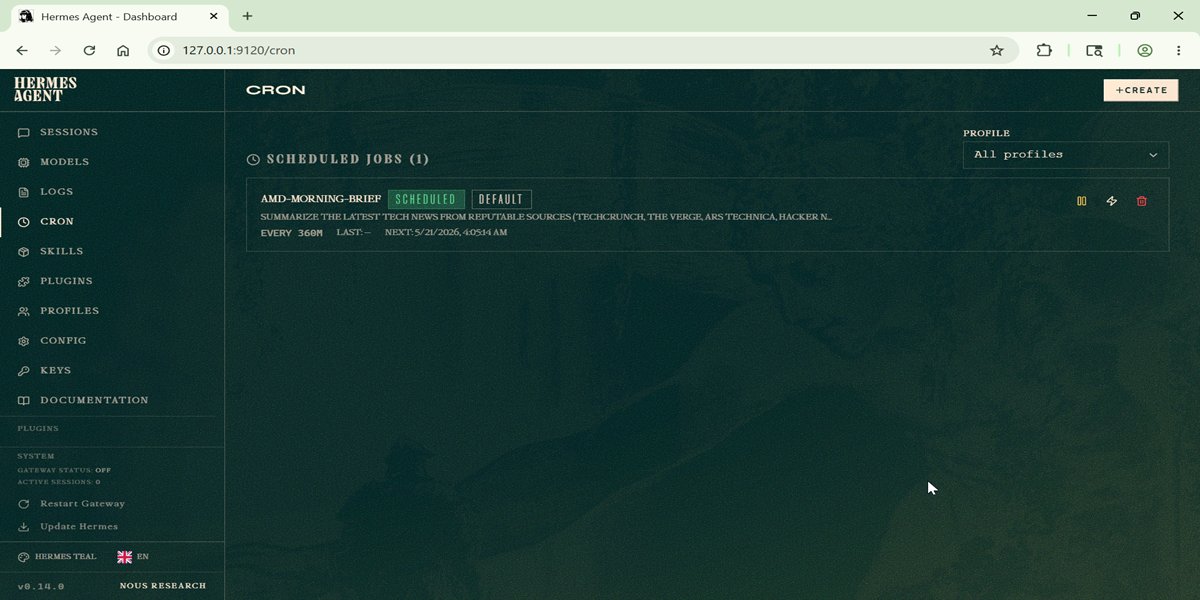
Click on the ‘Hermes Web UI’ displayed on the screen. This opens a browser-based interface (typically at `localhost:9119`) where you can:
- Toggle Skills: Enable or disable specific toolsets in real-time.
- Track Sessions: Monitor active agent reasoning cycles and session history.
- Configure Providers: Manage your model backends and system keys through a clean, visual GUI.
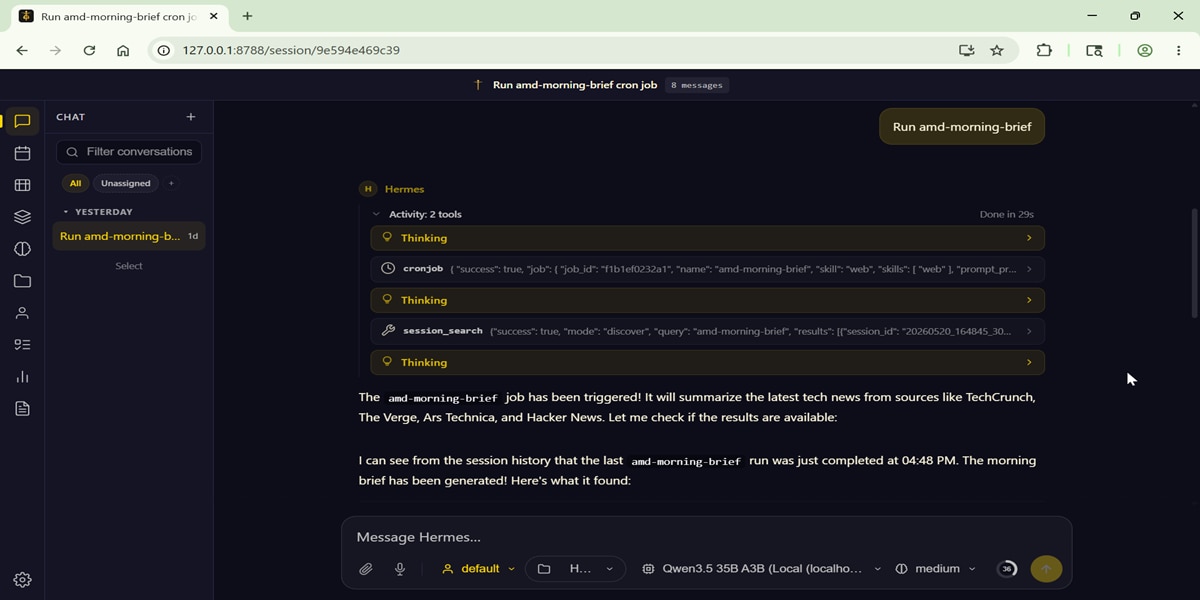
Note: The native Hermes Web UI does not support a chat interface by default. To address this, you can use the open-source repository hermes-webui to add a front-end chat layer to your setup. After following the installation instructions in the repository, your interface should look like the screenshot below:
Conclusion
You are now equipped with a fully autonomous, self-improving agent running on enterprise-grade AMD hardware. By combining the MI300X GPUs with Hermes Agent, you’ve created a system that doesn’t just process tasks – it evolves with them. This setup is just the beginning; you can adapt this workflow for any open-source model available on Hugging Face to suit your specific needs.
As you build, remember to share your insights with the community. Contributing to the AMD AI Developer Program by showcasing your projects is a great way to earn additional GPU credits and help push the boundaries of what’s possible with open-source AI.
Happy building!

Related Blogs
-
Open Standards, Real Solutions: AMD at SIGGRAPH 2026
AMD heads to DigiPro and SIGGRAPH 2026 to discuss open standards, production technology, and the fine art of Gaussian splatting.
July 17, 2026
-
FastFlowLM Joins AMD to Advance AI Inference
The FastFlowLM team has joined AMD, marking another key step in AMD’s strategy to advance AI performance and efficiency across the stack.
July 17, 2026
-
From Pixels to Predictions: Edge AI Pipeline Acceleration
Learn how AMD Vitis™ AI & AMD Vitis Video Analytics SDK (VVAS) use Gstreamer to build real-time Edge AI pipelines on AMD Versal™ AI Edge Series Gen 2.
July 16, 2026
-
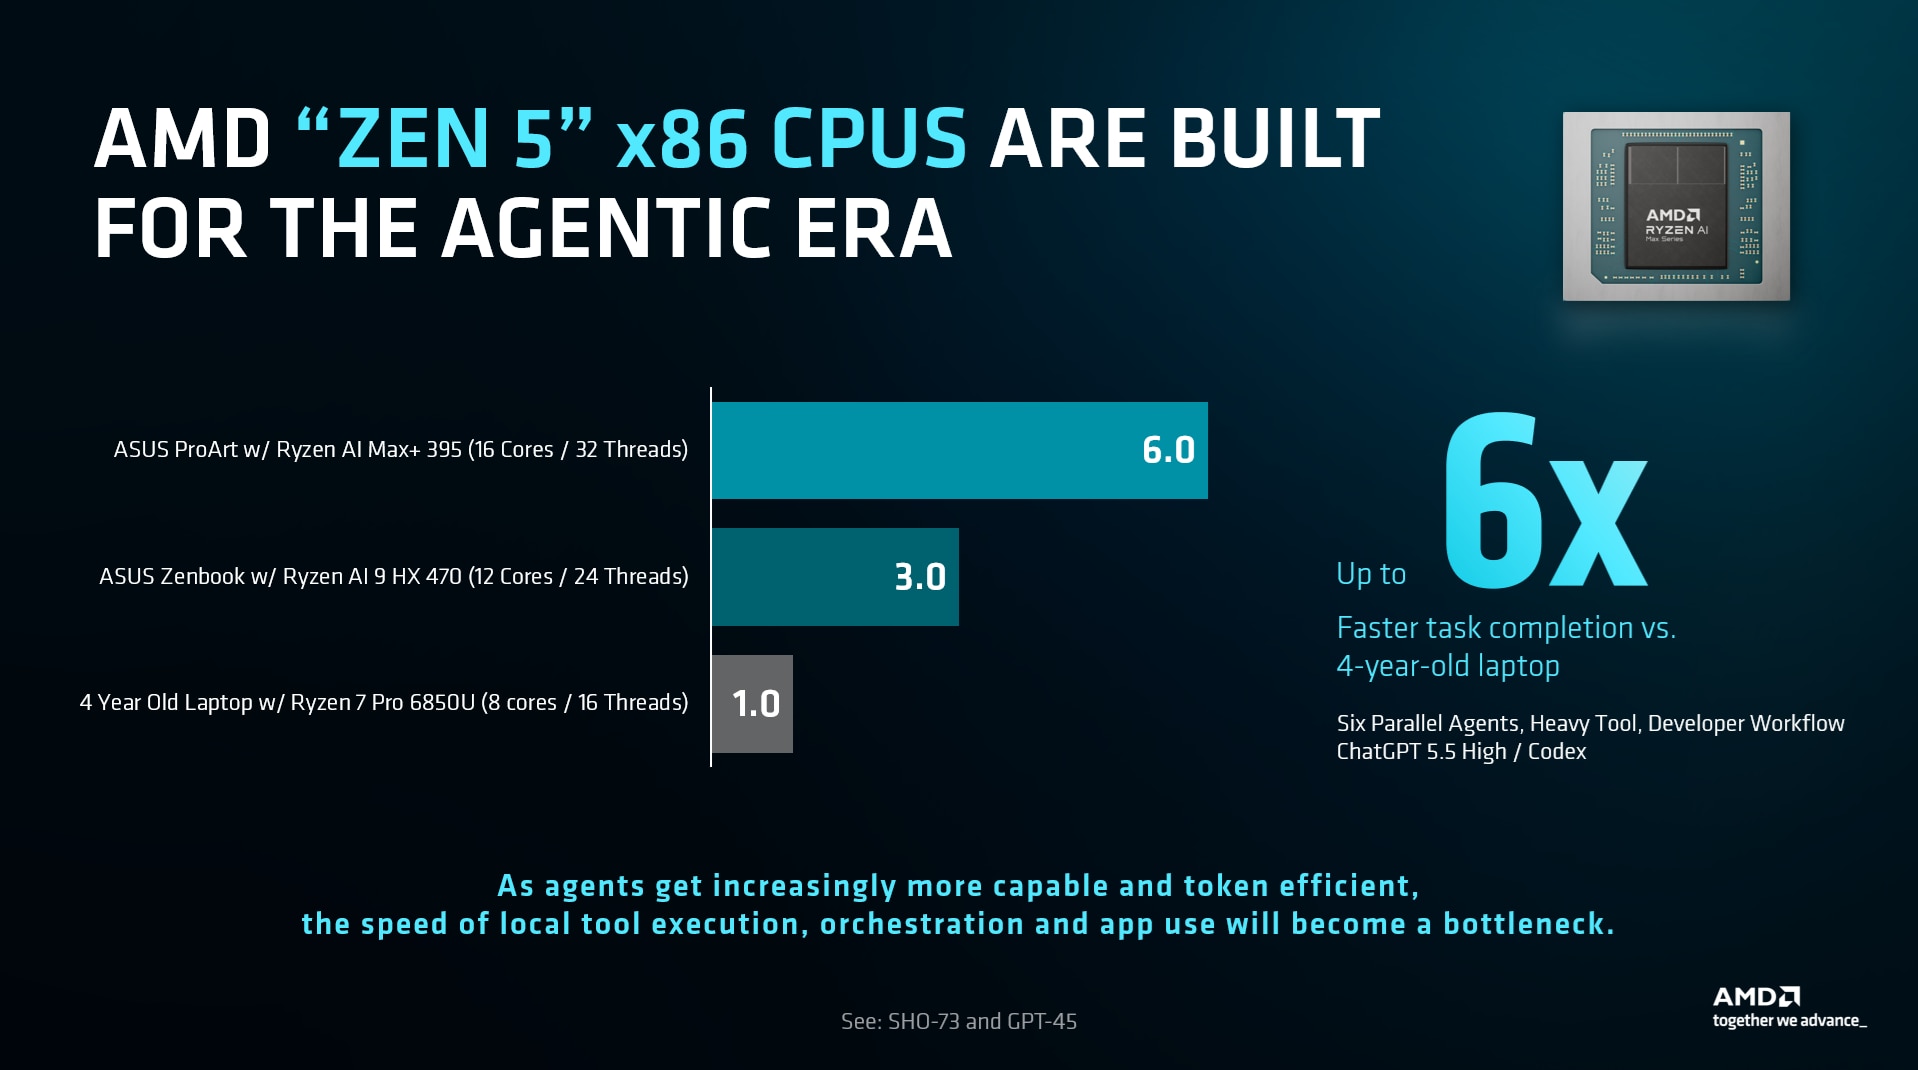
Running Cloud Agents? Your Most Important Upgrade Could be an AMD Zen 5 CPU
As agents begin navigating applications, coordinating tools and completing real work, the local CPU is becoming a critical part of the AI execution pipeline.
July 16, 2026
-
Multi-Accelerator Support for AIMs and AMD Solution Blueprints — ROCm Blogs
Deploy and run AIMs and AMD Solution Blueprints across AMD Instinct™ GPUs, AMD EPYC™ CPUs, and AMD Radeon™ GPUs
July 15, 2026
-
ROCm 7.14: TheRock Goes Production and Expands AMD’s AI Software Platform — ROCm Blogs
Explore what's new in ROCm 7.14: TheRock goes production, expanded hardware support, stronger AI frameworks, and enhanced profiling tools.
July 14, 2026
-
From Vector Search to Agentic RAG: Building an Enterprise Research Analyst with hipVS — ROCm Blogs
Learn how to build an agentic RAG research assistant using hipVS GPU-accelerated vector search on AMD Instinct GPUs, with multi-query decomposition, parallel retrieval, and cited sources synthesis.
July 14, 2026
-
When a Faster Kernel Doesn’t Speed Up Serving: Profiling FP8 KV Cache on AMD Instinct MI308X — ROCm Blogs
Learn how a 34% faster FP8 KV cache kernel delivered 0% E2E speedup, and how profiling attribution exposed the hidden dtype-cast cost on MI308X.
July 14, 2026